





How to Make the Perfect Rich and Creamy Keto Guava Cheesecake
Creating a Rich and Creamy Keto Guava Cheesecake is a delightful journey that combines simple steps with the joy of baking. I love how this recipe transforms basic ingredients into a tropical indulgence that feels like a special treat, even on a busy weeknight. Let’s dive into the process!
Step 1 – Prep Your Ingredients Quickly
Before you start, gather all your ingredients. Having everything ready makes the cooking process smoother and more enjoyable. I often find that when I prep my ingredients, it feels like I’m setting the stage for a delicious performance. Trust me, it’s worth the extra few minutes!
Step 2 – Begin Cooking
Start by preheating your oven to 325°F (163°C). While it warms up, grease a 9-inch springform pan with cooking spray or butter. In a medium bowl, combine the almond flour, unsweetened cocoa powder, erythritol, melted butter, vanilla extract, and salt. Mix until the texture resembles wet sand. Press this mixture firmly into the bottom of your prepared pan to form a crust. It should feel like a cozy blanket for your cheesecake!
Step 3 – Combine Ingredients and Cook
In a large mixing bowl, beat the softened cream cheese with an electric mixer until it’s smooth and creamy. Gradually add the erythritol, mixing until well incorporated. Add the eggs one at a time, ensuring each is fully blended before adding the next. Stir in the vanilla extract, guava puree, and lemon juice until everything is combined. The aroma of guava will fill your kitchen, making it hard to resist tasting!
Step 4 – Final Touches & Serving Suggestions
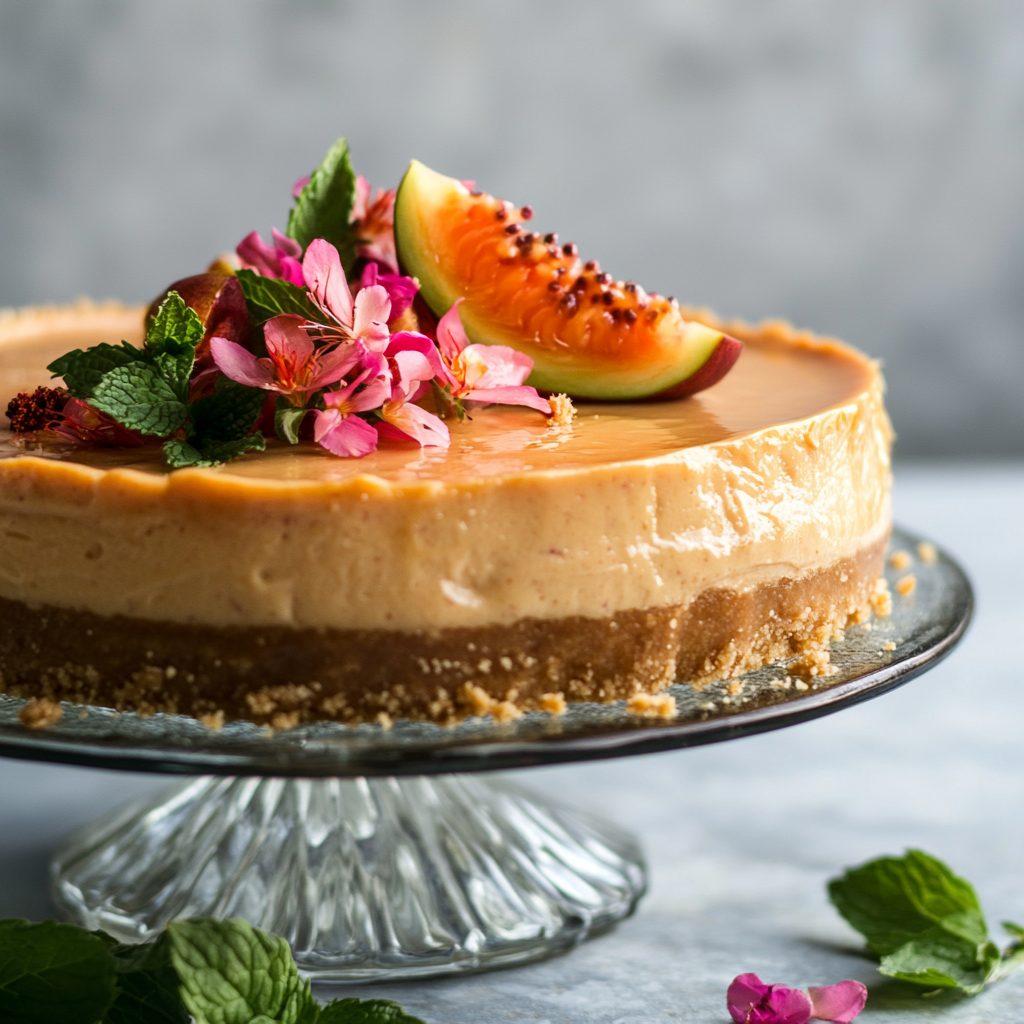
Pour the cheesecake filling over the cooled crust, smoothing the top with a spatula. Bake for 45-50 minutes, or until the edges are set and the center has a slight jiggle. Once done, turn off the oven and leave the cheesecake inside for an additional hour to cool gradually. This step is crucial for achieving that rich and creamy texture. After cooling, refrigerate the cheesecake for at least 4 hours, or preferably overnight. When you’re ready to serve, consider garnishing with fresh fruit or a dollop of whipped cream for an extra touch of elegance!
Introduction to Rich and Creamy Keto Guava Cheesecake
As a passionate home cook, I’ve seen the rise of keto desserts transform the way we indulge without guilt. The Rich and Creamy Keto Guava Cheesecake is a shining example of this trend, combining the lusciousness of cheesecake with the tropical flair of guava. It’s a dessert that not only satisfies your sweet tooth but also aligns with a low-carb lifestyle.
Guava, with its unique sweetness and fragrant aroma, pairs beautifully with the creamy texture of cheesecake. This delightful combination creates a dessert that feels indulgent yet remains health-conscious. Whether you’re hosting a dinner party or simply treating yourself after a long day, this cheesecake is the perfect way to enjoy a slice of paradise while sticking to your keto goals.
Why You’ll Love This Delicious Low-Carb Cheesecake Recipe
One of the best things about this Rich and Creamy Keto Guava Cheesecake is how incredibly easy it is to make. With just a handful of ingredients and straightforward steps, you can whip up a dessert that feels like a gourmet treat. I often find myself making this cheesecake on a busy weekend, knowing that it requires minimal effort but delivers maximum flavor.
The rich, creamy texture of this cheesecake is truly something special. Each bite melts in your mouth, offering a delightful contrast to the tropical guava flavor that dances on your palate. Unlike traditional cheesecakes that can be overly sweet, this keto version strikes the perfect balance, allowing the natural sweetness of guava to shine through. It’s like a mini-vacation for your taste buds!
Moreover, the health benefits of using keto-friendly ingredients make this cheesecake a guilt-free indulgence. With almond flour as the base, you’re getting a gluten-free option that’s low in carbs. The use of erythritol means you can enjoy sweetness without the sugar crash. This cheesecake not only satisfies your cravings but also aligns with your health goals, making it a win-win for anyone on a low-carb diet.
Ingredients You’ll Need for This Recipe
To create the Rich and Creamy Keto Guava Cheesecake, you’ll need a few essential ingredients that work together to deliver a delightful dessert. Here’s what you’ll need:
- 2 cups almond flour: This gluten-free flour serves as the perfect base for the crust, providing a nutty flavor and a satisfying texture.
- 1/2 cup unsweetened cocoa powder: Adds depth and richness to the crust, giving it a chocolatey twist that complements the guava beautifully.
- 1/4 cup granulated erythritol: A low-carb sweetener that allows you to enjoy sweetness without the sugar, making it ideal for keto diets.
- 1/2 cup unsalted butter, melted: This binds the crust together, creating a rich and buttery flavor that enhances the overall taste.
- 1/2 teaspoon vanilla extract: A classic flavor enhancer that elevates the taste of both the crust and the filling.
- 1/4 teaspoon salt: Balances the sweetness and enhances the flavors in the cheesecake.
- 16 ounces cream cheese, softened: The star of the show! This creamy filling base provides that luscious texture we all love in cheesecake.
- 1/2 cup guava puree: Infuses the cheesecake with a unique tropical flavor, making each bite a delightful escape.
- 1 tablespoon lemon juice: Adds a touch of acidity that brightens the flavors and complements the sweetness of the guava.
For those looking to lighten things up, consider substituting half of the cream cheese with Greek yogurt. You can also swirl in some additional guava puree on top of the cheesecake before baking for an extra burst of flavor!
How to Make the Perfect Rich and Creamy Keto Guava Cheesecake
Creating a Rich and Creamy Keto Guava Cheesecake is a delightful journey that combines simple steps with the joy of baking. I love how this recipe transforms basic ingredients into a tropical indulgence that feels like a special treat, even on a busy weeknight. Let’s dive into the process!
Step 1 – Prep Your Ingredients Quickly
Before you start, gather all your ingredients. Having everything ready makes the cooking process smoother and more enjoyable. I often find that when I prep my ingredients, it feels like I’m setting the stage for a delicious performance. Trust me, it’s worth the extra few minutes!
Step 2 – Begin Cooking
Start by preheating your oven to 325°F (163°C). While it warms up, grease a 9-inch springform pan with cooking spray or butter. In a medium bowl, combine the almond flour, unsweetened cocoa powder, erythritol, melted butter, vanilla extract, and salt. Mix until the texture resembles wet sand. Press this mixture firmly into the bottom of your prepared pan to form a crust. It should feel like a cozy blanket for your cheesecake!
Step 3 – Combine Ingredients and Cook
In a large mixing bowl, beat the softened cream cheese with an electric mixer until it’s smooth and creamy. Gradually add the erythritol, mixing until well incorporated. Add the eggs one at a time, ensuring each is fully blended before adding the next. Stir in the vanilla extract, guava puree, and lemon juice until everything is combined. The aroma of guava will fill your kitchen, making it hard to resist tasting!
Step 4 – Final Touches & Serving Suggestions
Pour the cheesecake filling over the cooled crust, smoothing the top with a spatula. Bake for 45-50 minutes, or until the edges are set and the center has a slight jiggle. Once done, turn off the oven and leave the cheesecake inside for an additional hour to cool gradually. This step is crucial for achieving that rich and creamy texture. After cooling, refrigerate the cheesecake for at least 4 hours, or preferably overnight. When you’re ready to serve, consider garnishing with fresh fruit or a dollop of whipped cream for an extra touch of elegance!
Expert Tips to Ensure Keto Cooking Success
To make your Rich and Creamy Keto Guava Cheesecake a resounding success, I’ve gathered some expert tips that I’ve learned through my own baking adventures. These simple yet effective strategies will help you achieve the best results every time!
- Use room temperature cream cheese: This is crucial for a smooth and creamy filling. Cold cream cheese can lead to lumps, making it difficult to achieve that velvety texture we all love. I always take my cream cheese out of the fridge at least an hour before I start baking.
- Don’t overbake: The key to a perfect cheesecake is knowing when to take it out of the oven. The center should have a slight jiggle when you remove it. This ensures that it will set perfectly as it cools. Overbaking can lead to a dry texture, which is the last thing you want!
- Refrigerate overnight: For the best flavor and texture, let your cheesecake chill in the fridge overnight. This allows the flavors to meld beautifully and gives the cheesecake time to firm up, making it easier to slice. Trust me, the wait is worth it!
By following these tips, you’ll be well on your way to creating a Rich and Creamy Keto Guava Cheesecake that will impress your family and friends. Happy baking!
Essential Kitchen Tools for This Keto Recipe
To make your Rich and Creamy Keto Guava Cheesecake a breeze, having the right kitchen tools on hand is essential. Here’s a list of the necessary tools that will help you create this delicious dessert:
- 9-inch springform pan: This is crucial for easy removal of your cheesecake once it’s set. If you don’t have a springform pan, a regular cake pan will work, but be sure to line it with parchment paper for easier serving.
- Mixing bowls: A set of various sizes will help you combine your ingredients efficiently. I often use a large bowl for the filling and a medium one for the crust.
- Electric mixer: This tool is a game-changer for achieving that smooth, creamy texture in your cheesecake filling. If you don’t have one, a whisk can work, but it will require more elbow grease!
- Spatula: A silicone spatula is perfect for scraping down the sides of your mixing bowl and smoothing the cheesecake filling. It’s a must-have for any baking project.
- Measuring cups and spoons: Accurate measurements are key to baking success. I recommend using a set of dry measuring cups for the flour and a liquid measuring cup for the guava puree.
With these essential tools, you’ll be well-equipped to whip up your Rich and Creamy Keto Guava Cheesecake with ease. Happy baking!
Delicious Variations to Customize Your Keto Dish
One of the joys of making a Rich and Creamy Keto Guava Cheesecake is the opportunity to customize it to suit your taste preferences. Here are some delightful variations that can elevate your cheesecake experience:
- Add citrus zest: For a refreshing twist, consider incorporating the zest of a lemon or lime into the cheesecake filling. This brightens the flavors and adds a zesty kick that complements the guava beautifully.
- Swap guava for other fruit purees: If you’re in the mood for something different, try using other fruit purees like raspberry or passion fruit. Each fruit brings its unique flavor profile, allowing you to create a cheesecake that’s uniquely yours!
- Incorporate chocolate chips: For those who crave a richer dessert, folding in some sugar-free chocolate chips into the filling can add a decadent touch. The combination of chocolate and guava is a match made in dessert heaven!
These variations not only keep your Rich and Creamy Keto Guava Cheesecake exciting but also allow you to experiment with flavors that resonate with your palate. So, don’t hesitate to get creative and make this recipe your own!
Best Keto-Friendly Sides & Beverage Pairings
When it comes to enjoying your Rich and Creamy Keto Guava Cheesecake, pairing it with the right sides and beverages can elevate your dessert experience to new heights. Here are some delightful keto-friendly options that complement the tropical flavors of the cheesecake:
- Fresh berries or a fruit salad: A medley of fresh berries like strawberries, raspberries, and blueberries adds a burst of color and flavor. Their natural sweetness and slight tartness balance the richness of the cheesecake beautifully.
- Herbal teas or sparkling water with lime: A refreshing herbal tea, such as mint or chamomile, can cleanse your palate after each bite. Alternatively, sparkling water with a squeeze of lime offers a fizzy, refreshing contrast that enhances the tropical vibe.
- Keto-friendly whipped cream or ice cream: For an extra indulgent touch, serve your cheesecake with a dollop of homemade keto whipped cream or a scoop of keto-friendly ice cream. This adds a creamy texture that pairs perfectly with the cheesecake’s richness.
These sides and beverages not only enhance the flavors of your Rich and Creamy Keto Guava Cheesecake but also create a well-rounded dessert experience that you and your guests will love. Enjoy your culinary adventure!
FAQs About Making Rich and Creamy Keto Guava Cheesecake at Home
As you embark on your journey to create the Rich and Creamy Keto Guava Cheesecake, you might have a few questions. Here are some common queries I’ve encountered, along with my insights to help you navigate the process smoothly:
- Can I use a different sweetener? Absolutely! While I love using granulated erythritol for its low-carb benefits, you can substitute it with other keto-friendly sweeteners like monk fruit or stevia. Just be sure to adjust the quantity according to the sweetness level of the alternative you choose.
- How long does the cheesecake last in the fridge? Your Rich and Creamy Keto Guava Cheesecake can last up to a week in the fridge when stored in an airtight container. However, I recommend enjoying it within the first few days for the best flavor and texture!
- Can I freeze the cheesecake? Yes, you can freeze your cheesecake! Just make sure it’s completely cooled and wrapped tightly in plastic wrap and then aluminum foil. It can be frozen for up to three months. When you’re ready to enjoy it, thaw it in the fridge overnight for the best results.
- What’s the best way to serve leftovers? To serve leftovers, simply slice the cheesecake into individual portions and plate them. You can add a fresh garnish of berries or a drizzle of sugar-free chocolate sauce for an extra touch. If you’ve frozen it, allow it to thaw in the fridge before serving for the best texture.
These FAQs should help clarify any uncertainties you may have about making your Rich and Creamy Keto Guava Cheesecake. Happy baking, and enjoy every delicious bite!
Final Thoughts on This Easy Keto-Friendly Rich and Creamy Keto Guava Cheesecake
As I reflect on the journey of creating this Rich and Creamy Keto Guava Cheesecake, I can’t help but feel a sense of joy and accomplishment. There’s something truly special about transforming simple ingredients into a dessert that not only satisfies cravings but also aligns with a healthy lifestyle. Each slice is a reminder that we can indulge without compromising our health goals.
Sharing this cheesecake with family and friends is one of my favorite parts. Watching their faces light up with delight as they take their first bite is priceless. It’s a beautiful way to bring people together, creating moments of connection and joy over a delicious treat. I encourage you to try this recipe and experience the happiness it brings, whether it’s for a special occasion or just a well-deserved treat after a long day.
As you embark on your own baking adventure, I invite you to share your experiences and variations with our community. Let’s inspire each other with our creativity and passion for keto cooking. Together, we can celebrate the joy of making and enjoying desserts that are both rich in flavor and kind to our bodies. Happy baking, and may your Rich and Creamy Keto Guava Cheesecake become a cherished favorite in your home!
Print
Rich and Creamy Keto Guava Cheesecake Awaits You!
- Total Time: 5 hours 20 minutes
- Yield: 10 servings 1x
- Diet: Low Calorie
Description
A deliciously rich and creamy keto-friendly cheesecake infused with guava flavor, perfect for dessert lovers on a low-carb diet.
Ingredients
- 2 cups almond flour
- 1/2 cup unsweetened cocoa powder
- 1/4 cup granulated erythritol
- 1/2 cup unsalted butter, melted
- 1/2 teaspoon vanilla extract
- 1/4 teaspoon salt
- 16 ounces cream cheese, softened
- 1/2 cup granulated erythritol (for filling)
- 2 large eggs
- 1 teaspoon vanilla extract (for filling)
- 1/2 cup guava puree (fresh or canned)
- 1 tablespoon lemon juice
Instructions
- Preheat your oven to 325°F (163°C).
- Grease a 9-inch springform pan with cooking spray or butter.
- In a medium bowl, combine almond flour, cocoa powder, erythritol, melted butter, vanilla extract, and salt. Mix until well combined and crumbly.
- Press the mixture firmly into the bottom of the prepared springform pan to form the crust.
- Bake for 10 minutes, then remove from the oven and let it cool.
- In a large mixing bowl, beat the softened cream cheese with an electric mixer until smooth and creamy.
- Gradually add the erythritol, mixing until well incorporated.
- Add the eggs one at a time, mixing well after each addition.
- Stir in the vanilla extract, guava puree, and lemon juice until fully combined.
- Pour the cheesecake filling over the cooled crust in the springform pan. Smooth the top with a spatula.
- Bake for 45-50 minutes, or until the edges are set and the center has a slight jiggle.
- Turn off the oven and leave the cheesecake inside for an additional hour to cool gradually.
- Once cooled, refrigerate the cheesecake for at least 4 hours, or preferably overnight, before serving.
Notes
- For a lighter version, substitute half of the cream cheese with Greek yogurt.
- Consider swirling in some additional guava puree on top of the cheesecake before baking for added flavor.
- Prep Time: 20 minutes
- Cook Time: 1 hour
- Category: Dessert
- Method: Baking
- Cuisine: Keto
Nutrition
- Serving Size: 1 slice
- Calories: 280
- Sugar: 4g
- Sodium: 200mg
- Fat: 26g
- Saturated Fat: 12g
- Unsaturated Fat: 14g
- Trans Fat: 0g
- Carbohydrates: 4g
- Fiber: 2g
- Protein: 6g
- Cholesterol: 80mg


