





How to Make the Perfect Okonomiyaki
Making Okonomiyaki is a delightful experience that fills your kitchen with mouthwatering aromas. I love how this savory pancake can be customized to suit any palate, making it a go-to dish for busy weeknights. Let’s dive into the step-by-step process to create this delicious Japanese treat!
Step 1 – Prep Your Ingredients Quickly
Before you start cooking, gather all your ingredients. This not only saves time but also makes the cooking process smoother. Chop your cabbage and green onions, measure out your flour and dashi broth, and have your eggs ready to go. Trust me, having everything prepped feels like having a secret weapon in the kitchen!
Step 2 – Begin Cooking
In a large mixing bowl, combine the all-purpose flour and dashi broth. Whisk until the mixture is smooth and free of lumps. The dashi broth adds a rich umami flavor that elevates the pancake. Heat your non-stick skillet over medium heat and add a splash of vegetable oil. The oil should shimmer but not smoke—this is the sweet spot for cooking!
Step 3 – Combine Ingredients and Cook
Now, it’s time to bring everything together! Add the shredded cabbage, green onions, eggs, and pickled ginger to your batter. If you’re using pork belly or shrimp, fold them in gently. Season with salt and pepper to taste. Pour about 1 cup of the batter onto the skillet, shaping it into a round pancake about ½ inch thick. Cook for about 4-5 minutes until the bottom is golden brown. Flip it carefully and cook for another 4-5 minutes on the other side. The aroma will be irresistible!
Step 4 – Final Touches & Serving Suggestions
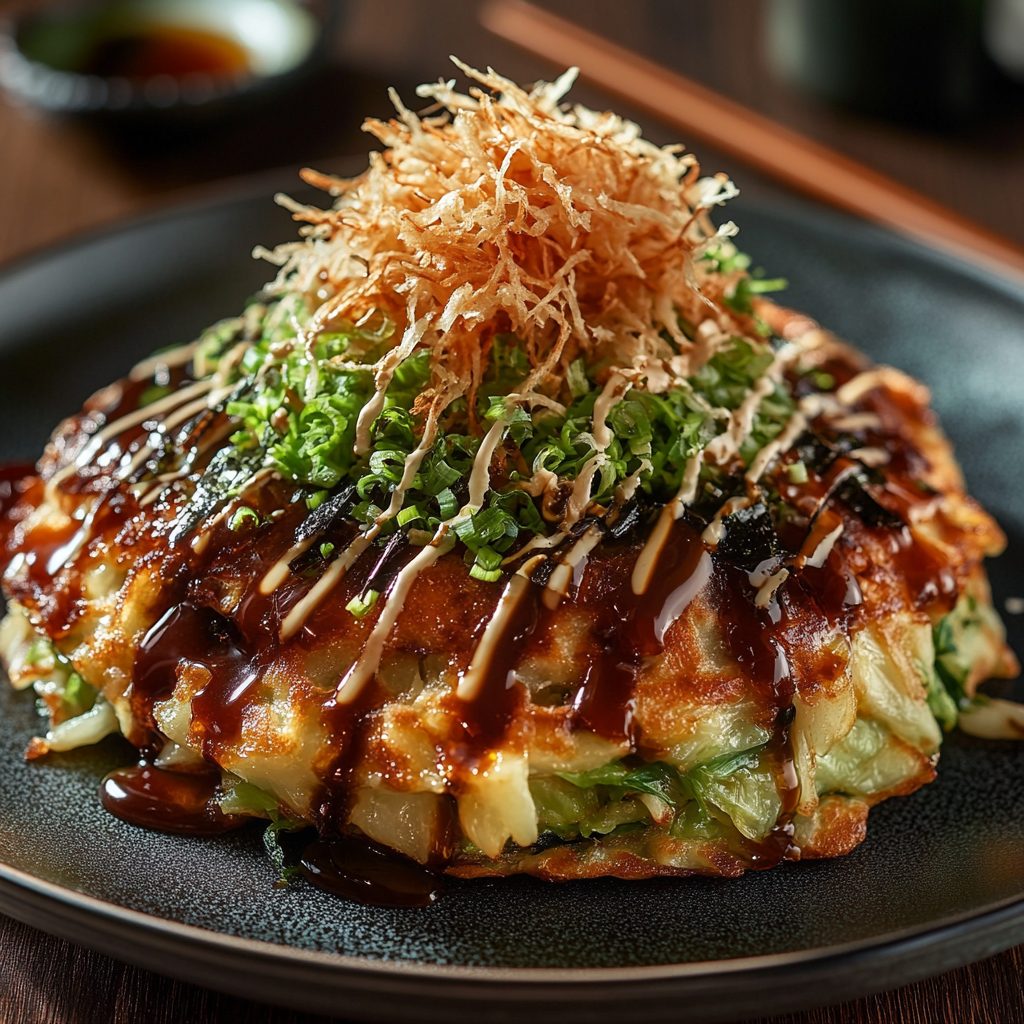
Once your Okonomiyaki is cooked through, transfer it to a plate. Drizzle generously with okonomiyaki sauce and Japanese mayonnaise for that authentic flavor. If you’re feeling fancy, sprinkle some aonori and katsuobushi on top for added texture and taste. Serve hot and watch your family dig in with delight!
Introduction to Okonomiyaki (Japan)
Okonomiyaki is more than just a dish; it’s a beloved Japanese pancake that brings families together around the table. The name itself translates to “grilled as you like it,” which perfectly captures its essence. This savory pancake is incredibly versatile, allowing you to mix and match ingredients based on your preferences and dietary needs. Whether you’re a busy professional or a health-conscious parent, Okonomiyaki is a fantastic option for a quick, satisfying meal.
What I love most about Okonomiyaki is its ease of preparation. In just 25 minutes, you can whip up a delicious meal that’s not only filling but also packed with flavor. The beauty of this dish lies in its adaptability; you can easily swap out ingredients to cater to your taste buds or dietary restrictions. Want to go vegetarian? No problem! Prefer a protein-packed version? Just add your favorite meat or seafood. The possibilities are endless, making Okonomiyaki a staple in my kitchen.
Why You’ll Love This Delicious Low-Carb Japanese Pancake Recipe
When it comes to quick weeknight dinners, Okonomiyaki is a game-changer. I can’t tell you how many times I’ve come home after a long day, only to whip up this savory pancake in under 30 minutes. The convenience of making Okonomiyaki at home means I can enjoy a delicious meal without the hassle of complicated recipes or lengthy prep times.
What truly sets Okonomiyaki apart is its rich flavors and delightful textures. Each bite is a harmonious blend of crispy cabbage, tender meat (if you choose to add it), and the umami goodness of dashi broth. The toppings—like the tangy okonomiyaki sauce and creamy Japanese mayonnaise—elevate the dish to a whole new level. It’s no wonder my family can’t get enough of it!
One of the best parts? This recipe is incredibly simple, making it accessible for cooks of all skill levels. Whether you’re a seasoned chef or just starting out, you’ll find that the steps are straightforward and easy to follow. Plus, the ability to customize the ingredients means you can cater to everyone’s tastes, ensuring that everyone at the table leaves satisfied.
So, if you’re looking for a delicious, low-carb meal that’s quick to prepare and bursting with flavor, Okonomiyaki is the perfect choice. Trust me, once you try it, you’ll be adding it to your regular dinner rotation!
Ingredients You’ll Need for This Recipe
To create the perfect Okonomiyaki, you’ll need a handful of essential ingredients that come together to make this savory pancake a delight. Here’s what you’ll need:
- All-purpose flour: This serves as the base for the pancake, giving it structure and a satisfying texture.
- Dashi broth: A key ingredient that adds umami flavor to the batter. If you don’t have dashi, water works as a suitable alternative.
- Shredded cabbage: This provides a delightful crunch and is packed with nutrition, making your pancake not just tasty but healthy too.
- Green onions: These add a burst of freshness and flavor, enhancing the overall taste of the dish.
- Eggs: They bind all the ingredients together, ensuring your pancake holds its shape while cooking.
- Pork belly or shrimp (optional): Adding these ingredients boosts the protein content and richness of the pancake, making it even more satisfying.
- Pickled ginger: This tangy addition enhances the flavor profile, giving your Okonomiyaki a delightful kick.
- Vegetable oil: Used for cooking, it helps achieve that perfect golden-brown crust.
- Okonomiyaki sauce and Japanese mayonnaise: These essential toppings bring a burst of flavor that elevates your pancake to new heights.
- Aonori and katsuobushi (optional): These garnishes add texture and a touch of authenticity, making your dish visually appealing.
Don’t worry about memorizing everything right now; exact measurements will be provided at the end of the recipe for your convenience!
How to Make the Perfect Okonomiyaki
Making Okonomiyaki is a delightful experience that fills your kitchen with mouthwatering aromas. I love how this savory pancake can be customized to suit any palate, making it a go-to dish for busy weeknights. Let’s dive into the step-by-step process to create this delicious Japanese treat!
Step 1 – Prep Your Ingredients Quickly
Before you start cooking, gather all your ingredients. This not only saves time but also makes the cooking process smoother. Chop your cabbage and green onions, measure out your flour and dashi broth, and have your eggs ready to go. Trust me, having everything prepped feels like having a secret weapon in the kitchen!
Step 2 – Begin Cooking
In a large mixing bowl, combine the all-purpose flour and dashi broth. Whisk until the mixture is smooth and free of lumps. The dashi broth adds a rich umami flavor that elevates the pancake. Heat your non-stick skillet over medium heat and add a splash of vegetable oil. The oil should shimmer but not smoke—this is the sweet spot for cooking!
Step 3 – Combine Ingredients and Cook
Now, it’s time to bring everything together! Add the shredded cabbage, green onions, eggs, and pickled ginger to your batter. If you’re using pork belly or shrimp, fold them in gently. Season with salt and pepper to taste. Pour about 1 cup of the batter onto the skillet, shaping it into a round pancake about ½ inch thick. Cook for about 4-5 minutes until the bottom is golden brown. Flip it carefully and cook for another 4-5 minutes on the other side. The aroma will be irresistible!
Step 4 – Final Touches & Serving Suggestions
Once your Okonomiyaki is cooked through, transfer it to a plate. Drizzle generously with okonomiyaki sauce and Japanese mayonnaise for that authentic flavor. If you’re feeling fancy, sprinkle some aonori and katsuobushi on top for added texture and taste. Serve hot and watch your family dig in with delight!
Expert Tips to Ensure Keto Cooking Success
As a passionate home cook, I’ve learned a few tricks to make my Okonomiyaki experience even better. Here are some expert tips to ensure your keto cooking is a success:
- Use a non-stick skillet: This is essential for easy flipping. A good non-stick surface prevents the pancake from sticking, allowing you to achieve that perfect golden-brown crust without any hassle.
- Experiment with different vegetables: Don’t hesitate to mix in other veggies like bell peppers, mushrooms, or even zucchini. This not only boosts the nutritional value but also adds exciting flavors and textures to your Okonomiyaki.
- Adjust cooking times based on pancake thickness: If you prefer a thicker pancake, you may need to cook it a bit longer. Keep an eye on the edges; when they start to look set, it’s time to flip! This ensures that your pancake is cooked through without burning.
By following these tips, you’ll elevate your Okonomiyaki game and impress your family with a delicious, homemade Japanese pancake that’s both satisfying and keto-friendly!
Essential Kitchen Tools for This Keto Recipe
To make your Okonomiyaki experience as smooth as possible, having the right kitchen tools is essential. Here’s a list of the necessary items you’ll need:
- Non-stick skillet or griddle: This is crucial for cooking your pancake evenly and preventing it from sticking. If you don’t have a non-stick option, a well-seasoned cast-iron skillet can work as a great alternative.
- Mixing bowls: You’ll need a couple of mixing bowls to combine your ingredients. If you’re short on space, a large measuring cup can double as a mixing bowl.
- Whisk or spatula: A whisk is perfect for mixing the batter until smooth. If you don’t have one, a fork can do the trick! A spatula is essential for flipping your pancake with ease.
- Measuring cups and spoons: Accurate measurements are key to achieving the perfect batter consistency. If you don’t have measuring cups, you can use a standard coffee mug or a drinking glass as a rough guide.
With these tools in hand, you’ll be well-equipped to create a delicious Okonomiyaki that will impress your family and friends!
Delicious Variations to Customize Your Keto Dish
One of the best things about Okonomiyaki is its versatility. You can easily customize this savory pancake to suit your taste preferences or dietary needs. Here are some delicious variations to consider:
- Vegetarian Options: For a meat-free version, try adding sautéed mushrooms or colorful bell peppers. These veggies not only enhance the flavor but also add a delightful crunch to your pancake.
- Different Proteins: If you’re looking to switch things up, consider using chicken or tofu as your protein source. Grilled chicken adds a savory touch, while tofu provides a plant-based option that’s equally satisfying.
- Unique Toppings: Elevate your Okonomiyaki with creative toppings! Sliced avocado adds creaminess, while a sprinkle of sesame seeds introduces a nutty flavor. You can also experiment with fresh herbs like cilantro or basil for a refreshing twist.
Feel free to mix and match these variations to create your perfect Okonomiyaki. The beauty of this dish lies in its adaptability, allowing you to enjoy a new flavor experience every time you make it!
Best Keto-Friendly Sides & Beverage Pairings
To elevate your Okonomiyaki experience, pairing it with the right sides and beverages can make all the difference. Here are some easy, keto-friendly options that complement the savory flavors of your pancake:
- Cucumber salad with sesame dressing: This refreshing salad adds a crunchy contrast to the warm pancake. The sesame dressing brings a nutty flavor that perfectly balances the dish.
- Miso soup: A light starter that warms the soul, miso soup is a classic Japanese dish that pairs beautifully with Okonomiyaki. Its umami flavor enhances the overall meal experience.
- Sparkling water with lemon: For a refreshing drink, opt for sparkling water with a splash of lemon. This bubbly beverage cleanses the palate and adds a zesty touch to your meal.
These sides and beverages not only complement the flavors of Okonomiyaki but also keep your meal light and keto-friendly. Enjoy your culinary adventure!
FAQs About Making Okonomiyaki at Home
As you embark on your Okonomiyaki journey, you might have a few questions. Here are some common queries I’ve encountered, along with my answers to help you navigate this delicious dish:
- Can I make Okonomiyaki ahead of time? Absolutely! You can prepare the batter in advance and store it in the refrigerator for up to 24 hours. Just give it a good stir before cooking. However, I recommend cooking the pancakes fresh for the best texture and flavor.
- What are some gluten-free alternatives for the flour? If you’re looking for gluten-free options, consider using almond flour or coconut flour. You may need to adjust the liquid content slightly, as these flours absorb moisture differently than all-purpose flour.
- How can I store leftovers? To store any leftover Okonomiyaki, let it cool completely, then place it in an airtight container in the refrigerator. It will keep for about 2-3 days. Reheat in a skillet over low heat for the best results, ensuring it stays crispy!
These tips should help you enjoy Okonomiyaki to the fullest, whether you’re making it fresh or saving some for later!
Final Thoughts on This Easy Keto-Friendly Okonomiyaki
As I wrap up this journey into the world of Okonomiyaki, I can’t help but reflect on the joy this dish brings to my kitchen. There’s something incredibly satisfying about creating a meal that not only tastes amazing but also allows for endless customization. Whether you’re cooking for yourself or sharing with loved ones, Okonomiyaki is a dish that fosters connection and conversation.
I encourage you to try this easy keto-friendly recipe and make it your own. Experiment with different ingredients, toppings, and flavors that resonate with your palate. The beauty of Okonomiyaki lies in its versatility, making it a perfect canvas for your culinary creativity. Don’t forget to share your experiences and variations with me—I’d love to hear how you’ve made this dish uniquely yours!
So, gather your ingredients, fire up that skillet, and let the aroma of Okonomiyaki fill your home. I promise you, once you take that first bite, you’ll understand why this savory pancake has captured the hearts of so many. Happy cooking!
Print
Okonomiyaki (Japan): Discover this Savory Pancake Recipe!
- Total Time: 25 minutes
- Yield: 4 servings 1x
- Diet: Vegetarian
Description
Discover the savory Japanese pancake known as Okonomiyaki, a delicious dish that can be customized with various ingredients.
Ingredients
- 2 cups all-purpose flour
- 1 ½ cups dashi broth (or water)
- 1 cup shredded cabbage
- ½ cup green onions, chopped
- 2 large eggs
- 1 cup cooked and chopped pork belly or shrimp (optional)
- ¼ cup pickled ginger, chopped
- Salt and pepper to taste
- Vegetable oil for cooking
- Okonomiyaki sauce (for drizzling)
- Japanese mayonnaise (for drizzling)
- Aonori (dried seaweed flakes) for garnish (optional)
- Katsuobushi (bonito flakes) for garnish (optional)
Instructions
- In a large mixing bowl, combine the flour and dashi broth, whisking until smooth.
- Add the shredded cabbage, green onions, eggs, and pickled ginger to the batter. If using, fold in the cooked pork belly or shrimp. Season with salt and pepper to taste.
- Heat a non-stick skillet or griddle over medium heat and add a little vegetable oil.
- Pour about 1 cup of the batter onto the skillet, spreading it into a round pancake shape about ½ inch thick.
- Cook for about 4-5 minutes until the bottom is golden brown, then carefully flip and cook for another 4-5 minutes on the other side.
- Once cooked through, transfer to a plate and drizzle with okonomiyaki sauce and Japanese mayonnaise.
- Garnish with aonori and katsuobushi if desired. Serve hot.
Notes
- For a vegetarian version, omit the meat and add more vegetables like mushrooms or bell peppers.
- Experiment with different toppings such as sliced avocado or a sprinkle of sesame seeds for added flavor and texture.
- Prep Time: 15 minutes
- Cook Time: 10 minutes
- Category: Main Dish
- Method: Grilling
- Cuisine: Japanese
Nutrition
- Serving Size: 1 pancake
- Calories: 320
- Sugar: 0g
- Sodium: 0mg
- Fat: 18g
- Saturated Fat: 0g
- Unsaturated Fat: 0g
- Trans Fat: 0g
- Carbohydrates: 30g
- Fiber: 0g
- Protein: 12g
- Cholesterol: 0mg


