





How to Make the Perfect Dosa
Making the perfect dosa is an art, and I’m here to guide you through each step. With a little patience and practice, you’ll be flipping crispy dosas in no time!
Step 1 – Prep Your Ingredients Quickly
Start by rinsing the rice and urad dal together in cold water. This step is crucial; it removes excess starch and ensures a smooth batter. Soak the rice, urad dal, and fenugreek seeds in enough water for at least 4 hours or, if you can, overnight. This soaking process softens the ingredients, making them easier to blend and essential for that perfect texture.
Step 2 – Begin Cooking
Once your ingredients are soaked, drain them and transfer them to a blender. Add about 1 cup of fresh water and blend until you achieve a smooth batter. The consistency should be similar to pancake batter—thick yet pourable. This is where the magic begins, as the blending releases the flavors and creates a creamy texture.
Step 3 – Combine Ingredients and Cook
Now, it’s time for fermentation! Transfer the batter to a large bowl, cover it with a cloth, and let it sit in a warm place for 8 to 12 hours. This fermentation process is key to developing that signature tangy flavor and airy texture. You’ll know it’s ready when the batter has doubled in size and has a pleasant aroma.
Step 4 – Final Touches & Serving Suggestions
Once fermented, gently stir the batter and add salt to taste. Heat a non-stick skillet or cast-iron griddle over medium heat and lightly grease the surface with oil or ghee. Pour about 1/2 cup of batter onto the center of the skillet and quickly spread it into a thin circle. Drizzle a little oil or ghee around the edges and cook for about 2-3 minutes until the edges start to lift and the bottom is golden brown. Flip the dosa and cook for an additional 1-2 minutes. Remove from the skillet and keep warm. Repeat with the remaining batter.
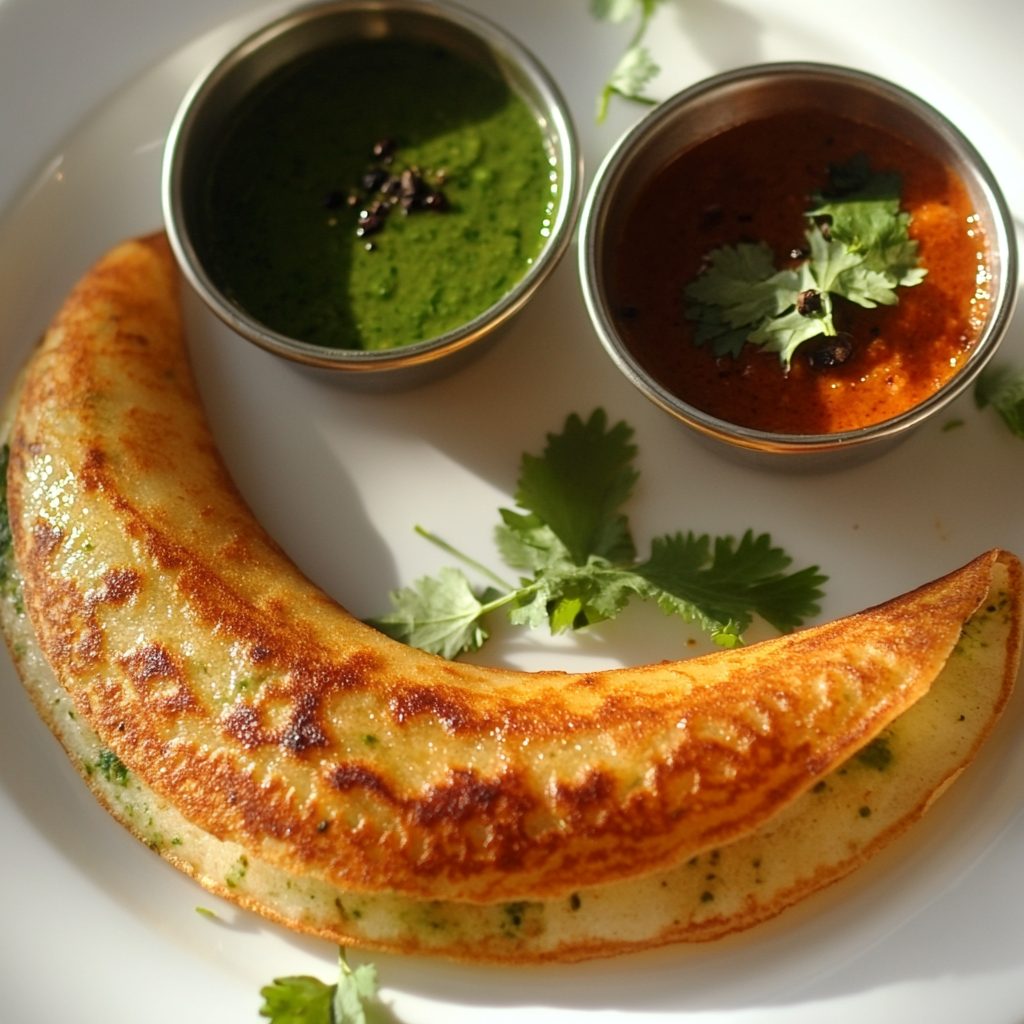
Serve your crispy dosas hot with coconut chutney and sambar for a delightful meal that’s sure to impress!
Introduction to Dosa
Dosa is more than just a dish; it’s a beloved staple of South Indian cuisine that has captured hearts around the world. Imagine a golden, crispy crepe that’s both light and satisfying, with a texture that’s simply irresistible. The beauty of dosa lies in its versatility; it can be enjoyed plain, filled with spiced potatoes, or paired with a variety of chutneys and sambar. Each bite is a delightful experience, making it a favorite for breakfast, lunch, or dinner.
As a busy home cook, I understand the challenge of balancing a hectic lifestyle with the desire to eat healthily. Dosa fits perfectly into this equation. With a little planning, you can whip up a batch of dosas that not only satisfy your cravings but also provide a nutritious meal option. The soaking and fermentation process can be done overnight, allowing you to enjoy a quick, wholesome breakfast in the morning. Plus, the ingredients are simple and easy to find, making dosa a practical choice for health-conscious individuals.
Why You’ll Love This Delicious Low-Carb Dosa Recipe
Making dosa at home is not just convenient; it’s a rewarding experience that brings the flavors of South India right to your kitchen. With minimal effort, you can create a dish that’s both delicious and nutritious. The preparation is straightforward, allowing you to soak the ingredients overnight and blend them in the morning. This means you can enjoy a hot, crispy dosa without spending hours in the kitchen.
The delightful taste and texture of crispy dosa are what truly set it apart. Imagine biting into a perfectly golden dosa, its edges crisp and the center soft. Each mouthful is a harmonious blend of flavors, especially when paired with coconut chutney or sambar. It’s no wonder that dosa has become a family favorite in many households, as it appeals to both kids and adults alike.
What I love most about this recipe is its simplicity. Whether you’re a seasoned cook or just starting your culinary journey, you’ll find this dosa recipe accessible and easy to follow. The steps are clear, and the ingredients are straightforward, making it a perfect choice for anyone looking to whip up a healthy meal without the fuss. Plus, the satisfaction of creating something so delicious from scratch is truly unmatched!
Ingredients You’ll Need for This Recipe
To create the perfect dosa, you’ll need a few essential ingredients that come together to form a delicious and crispy dish. Here’s what you’ll need:
- 1 cup rice (preferably long-grain or basmati) – for the base texture that gives dosa its signature crispiness.
- 1/3 cup split urad dal (black gram) – adds protein and richness, making your dosa not just tasty but also nutritious.
- 1/4 teaspoon fenugreek seeds – enhances flavor and aids in fermentation, contributing to that delightful tang.
- 1/2 teaspoon salt (adjust to taste) – essential for seasoning, bringing all the flavors together.
- Water (as needed for soaking and blending) – crucial for achieving the right batter consistency.
- Oil or ghee (for cooking) – ensures that your dosa gets that perfect crispy finish.
For those who enjoy a little heat, consider adding chopped green chilies to the batter for a spicy kick. You can also explore alternatives like using cauliflower rice for a low-carb twist, making this dish suitable for various dietary preferences.
Don’t worry about memorizing these measurements right now; I’ll provide exact amounts at the end of the recipe for your convenience!
How to Make the Perfect Dosa
Making the perfect dosa is an art, and I’m here to guide you through each step. With a little patience and practice, you’ll be flipping crispy dosas in no time!
Step 1 – Prep Your Ingredients Quickly
Start by rinsing the rice and urad dal together in cold water. This step is crucial; it removes excess starch and ensures a smooth batter. Soak the rice, urad dal, and fenugreek seeds in enough water for at least 4 hours or, if you can, overnight. This soaking process softens the ingredients, making them easier to blend and essential for that perfect texture.
Step 2 – Begin Cooking
Once your ingredients are soaked, drain them and transfer them to a blender. Add about 1 cup of fresh water and blend until you achieve a smooth batter. The consistency should be similar to pancake batter—thick yet pourable. This is where the magic begins, as the blending releases the flavors and creates a creamy texture.
Step 3 – Combine Ingredients and Cook
Now, it’s time for fermentation! Transfer the batter to a large bowl, cover it with a cloth, and let it sit in a warm place for 8 to 12 hours. This fermentation process is key to developing that signature tangy flavor and airy texture. You’ll know it’s ready when the batter has doubled in size and has a pleasant aroma.
Step 4 – Final Touches & Serving Suggestions
Once fermented, gently stir the batter and add salt to taste. Heat a non-stick skillet or cast-iron griddle over medium heat and lightly grease the surface with oil or ghee. Pour about 1/2 cup of batter onto the center of the skillet and quickly spread it into a thin circle. Drizzle a little oil or ghee around the edges and cook for about 2-3 minutes until the edges start to lift and the bottom is golden brown. Flip the dosa and cook for an additional 1-2 minutes. Remove from the skillet and keep warm. Repeat with the remaining batter.
Serve your crispy dosas hot with coconut chutney and sambar for a delightful meal that’s sure to impress!
Expert Tips to Ensure Keto Cooking Success
Perfecting dosa is all about attention to detail, and I’ve gathered some expert tips to help you achieve that crispy, golden perfection every time!
- Ensure a Smooth Batter: The key to even cooking lies in the consistency of your batter. Blend until it’s silky smooth, as lumps can lead to uneven cooking and a less-than-ideal texture. If it feels too thick, add a splash of water to achieve that pancake-like consistency.
- Master the Skillet Temperature: Getting the right skillet temperature is crucial for crispy results. Preheat your non-stick skillet or cast-iron griddle over medium heat. If it’s too hot, your dosa will burn; too cool, and it won’t crisp up. A drop of water should sizzle and evaporate quickly when the skillet is ready.
- Experiment with Fermentation Times: Fermentation is where the magic happens! Depending on your kitchen’s warmth, you might find that your batter ferments faster or slower. Don’t hesitate to experiment with fermentation times; a longer fermentation can deepen the flavor and enhance the texture, giving you that authentic dosa experience.
By following these tips, you’ll be well on your way to mastering the art of dosa-making, ensuring that each bite is a delightful crunch that keeps you coming back for more!
Essential Kitchen Tools for This Keto Recipe
To make your dosa-making experience smooth and enjoyable, having the right kitchen tools is essential. Here’s a list of the necessary tools you’ll need:
- Non-stick skillet or cast-iron griddle: This is crucial for achieving that perfect crispy texture. If you don’t have a non-stick skillet, a well-seasoned cast-iron griddle works wonders too!
- Blender: A good-quality blender is key for creating a smooth batter. If you don’t have a blender, you can use a food processor, but be prepared for a bit more effort in achieving the right consistency.
- Measuring cups: Accurate measurements are important for the best results. If you don’t have measuring cups, you can use any small cup or container, just keep the proportions consistent.
With these tools in hand, you’ll be well-equipped to whip up delicious dosas that will impress your family and friends!
Delicious Variations to Customize Your Keto Dish
One of the best things about dosa is its versatility. You can easily customize this dish to suit your taste preferences or dietary needs. Here are some delightful variations to consider:
- Spicy Dosa: For those who crave a little heat, add chopped green chilies or a pinch of black pepper to the batter before blending. This spicy twist will elevate your dosa, making it a flavorful treat that packs a punch!
- Masala Dosa: A classic favorite, masala dosa is filled with a mixture of spiced mashed potatoes. To make this, simply prepare a filling by sautéing boiled potatoes with onions, mustard seeds, turmeric, and curry leaves. Spread the filling on your crispy dosa before folding it over for a hearty meal.
- Vegetable Dosa: Boost the nutrition of your dosa by adding mixed veggies to the batter. Finely chop vegetables like carrots, bell peppers, and spinach, and fold them into the batter before cooking. This not only adds color but also enhances the flavor and nutritional value of your dish.
These variations allow you to explore different flavors and textures, making each dosa experience unique. Whether you prefer it spicy, stuffed, or loaded with veggies, there’s a dosa variation for everyone!
Best Keto-Friendly Sides & Beverage Pairings
To elevate your dosa experience, pairing it with the right sides and beverages can make all the difference. Here are some easy, keto-friendly options that complement the crispy goodness of dosa:
- Coconut Chutney: This classic accompaniment is a must-try! Made from fresh grated coconut, green chilies, and a hint of ginger, coconut chutney adds a creamy, flavorful contrast to the crispy dosa. It’s low in carbs and packed with healthy fats, making it a perfect keto side.
- Sambar: A hearty lentil soup, sambar is rich in protein and flavor. Made with toor dal (pigeon peas) and a variety of vegetables, it’s seasoned with aromatic spices that enhance the overall meal. This warm, comforting dish pairs beautifully with dosa, providing a nutritious boost.
- Herbal Teas: For a refreshing beverage, consider herbal teas like chamomile or peppermint. These teas are naturally low in carbs and can aid digestion, making them a great choice alongside your dosa. They also offer a soothing contrast to the crispy texture of the dish.
- Low-Carb Smoothies: If you’re in the mood for something a bit more filling, whip up a low-carb smoothie. Blend together spinach, avocado, unsweetened almond milk, and a scoop of protein powder for a nutritious drink that complements your meal without adding excess carbs.
These sides and beverages not only enhance the flavors of your dosa but also align perfectly with your keto lifestyle. Enjoy experimenting with these pairings to find your favorite combinations!
FAQs About Making Dosa at Home
As you embark on your dosa-making journey, you might have a few questions. Here are some common queries I’ve encountered, along with helpful answers to ensure your experience is as smooth as possible!
- How long can I store leftover dosa batter?
You can store leftover dosa batter in the refrigerator for up to 3 days. Just make sure to keep it in an airtight container. Before using, give it a good stir and check the smell; if it smells off, it’s best to discard it. - Can I freeze cooked dosas?
Absolutely! Cooked dosas can be frozen for up to a month. Just let them cool completely, then stack them with parchment paper in between to prevent sticking. When you’re ready to enjoy them, simply reheat in a skillet or toaster oven. - What are the best ways to reheat dosa without losing crispiness?
To maintain that delightful crispiness, reheat your dosa in a non-stick skillet over medium heat for a couple of minutes on each side. Avoid using the microwave, as it can make the dosa soggy. If you’re in a hurry, a toaster oven works well too!
These tips should help you navigate any challenges you might face while making dosa at home. Enjoy the process, and don’t hesitate to experiment to find what works best for you!
Final Thoughts on This Easy Keto-Friendly Dosa
As I reflect on my journey of making dosa at home, I can’t help but feel a sense of joy and accomplishment. There’s something truly special about creating a dish that not only satisfies your cravings but also brings a taste of South India right to your kitchen. The process of soaking, blending, and fermenting transforms simple ingredients into a crispy delight that can be enjoyed at any meal.
I encourage you to try this easy keto-friendly dosa recipe and experience the magic for yourself. Whether you enjoy it plain, stuffed, or paired with your favorite chutneys, I promise it will become a cherished addition to your meal rotation. Don’t forget to share your experiences and variations with me! I love hearing how others put their unique spin on this classic dish.
Let’s foster a sense of community around our love for cooking and healthy eating. Together, we can inspire each other to explore new flavors and techniques in the kitchen. Happy cooking, and may your dosas always be crispy and delicious!
Print
Dosa: Discover the Secret to Crispy Perfection!
- Total Time: 4 hours 20 minutes
- Yield: 4 servings 1x
- Diet: Vegetarian
Description
Discover the secret to making crispy South Indian Dosa, a delicious and versatile dish.
Ingredients
- 1 cup rice (preferably long-grain or basmati)
- 1/3 cup split urad dal (black gram)
- 1/4 teaspoon fenugreek seeds
- 1/2 teaspoon salt (adjust to taste)
- Water (as needed for soaking and blending)
- Oil or ghee (for cooking)
Instructions
- Rinse the rice and urad dal together in cold water until the water runs clear.
- Soak the rice, urad dal, and fenugreek seeds in enough water for at least 4 hours or overnight.
- Drain the soaked ingredients and transfer them to a blender. Add about 1 cup of fresh water and blend until you achieve a smooth batter.
- Transfer the batter to a large bowl, cover it with a cloth, and let it ferment in a warm place for 8 to 12 hours.
- Once fermented, stir the batter gently and add salt.
- Heat a non-stick skillet or cast-iron griddle over medium heat and lightly grease the surface with oil or ghee.
- Pour about 1/2 cup of batter onto the center of the skillet and quickly spread it into a thin circle.
- Drizzle a little oil or ghee around the edges and cook for about 2-3 minutes until the edges start to lift and the bottom is golden brown.
- Flip the dosa and cook for an additional 1-2 minutes.
- Remove from the skillet and keep warm. Repeat with the remaining batter.
- Serve the dosas hot with coconut chutney and sambar.
Notes
- For a spicier version, add chopped green chilies or black pepper to the batter before blending.
- You can also fill the dosa with a mixture of mashed potatoes and spices for a classic masala dosa.
- Prep Time: 4 hours
- Cook Time: 20 minutes
- Category: Breakfast
- Method: Griddling
- Cuisine: Indian
Nutrition
- Serving Size: 1 dosa
- Calories: 150
- Sugar: 0g
- Sodium: 0mg
- Fat: 3g
- Saturated Fat: 0g
- Unsaturated Fat: 0g
- Trans Fat: 0g
- Carbohydrates: 25g
- Fiber: 0g
- Protein: 5g
- Cholesterol: 0mg


