





How to Make the Perfect Nanaimo Bars – Canada
Making Nanaimo Bars is a delightful experience that brings the flavors of Canada right into your kitchen. With just a few simple steps, you can create this no-bake treat that’s perfect for busy days. Let’s dive into the process!
Step 1 – Prep Your Ingredients Quickly
Before you start, gather all your ingredients and tools. This will save you time and make the process smoother. You’ll need:
- Mixing bowls
- An 8-inch square baking pan
- A spatula for spreading
- A microwave-safe bowl for melting chocolate
Step 2 – Begin Cooking
In a medium bowl, combine the graham cracker crumbs, unsweetened cocoa powder, powdered sugar, shredded coconut, softened butter, egg, and vanilla extract. Mix until everything is well combined. The mixture should be moist and crumbly, like a sandy beach ready for building castles!
Step 3 – Combine Ingredients and Cook
Press the mixture firmly into the bottom of your greased baking pan. This base layer is the foundation of your Nanaimo Bars, so make sure it’s packed tightly. Next, in another bowl, beat together the softened butter, powdered sugar, custard powder, and milk until smooth and creamy. Spread this luscious custard mixture evenly over the graham cracker layer.
Step 4 – Final Touches & Serving Suggestions
For the topping, melt the chopped semi-sweet chocolate and butter together in your microwave-safe bowl. Do this in 30-second intervals, stirring in between until it’s silky smooth. Pour the melted chocolate over the custard layer and spread it evenly. Now, refrigerate the bars for at least 2 hours or until set. Once they’re firm, cut them into squares and serve. Enjoy the rich, layered flavors of your homemade Nanaimo Bars!
Introduction to Nanaimo Bars – Canada
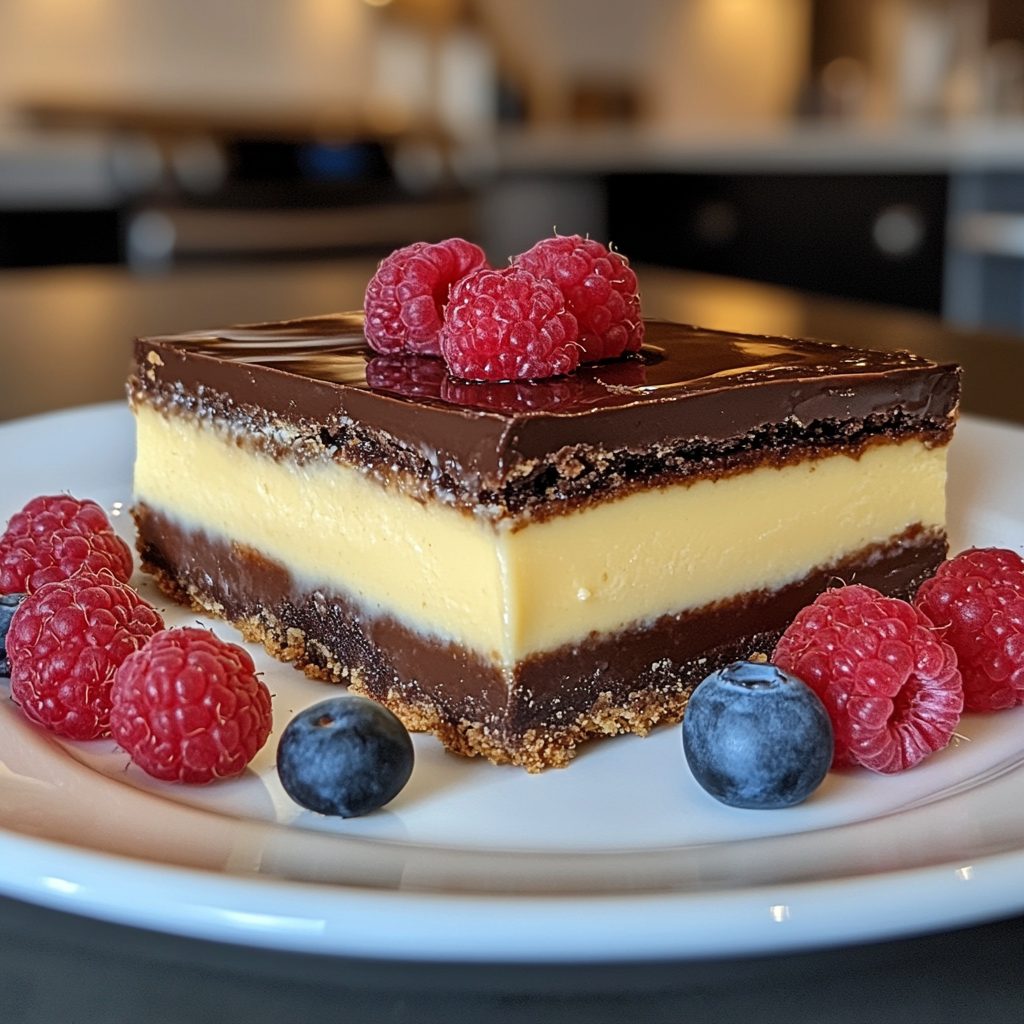
Nanaimo Bars are more than just a dessert; they are a beloved Canadian classic that brings a taste of nostalgia to anyone who has had the pleasure of indulging in them. These delightful bars feature a rich chocolate topping, a creamy custard middle, and a crumbly base that creates a symphony of flavors and textures in every bite.
As a busy health-conscious adult, I know how challenging it can be to find time to whip up a delicious treat. That’s where Nanaimo Bars shine! This no-bake recipe is not only quick to prepare but also requires minimal cooking time, making it the perfect solution for those hectic days when you crave something sweet without the fuss. With just a few simple ingredients, you can create a dessert that’s sure to impress family and friends while satisfying your sweet tooth.
Why You’ll Love This Delicious Low-Carb Canadian Dessert Recipe
If you’re like me, juggling a busy schedule while trying to maintain a healthy lifestyle can be quite the challenge. That’s why I absolutely adore this no-bake Nanaimo Bars recipe! It requires minimal cooking time, allowing you to whip up a delightful dessert in just 20 minutes, plus a little chilling time. No oven required means less mess and more time to enjoy life!
The combination of flavors and textures in Nanaimo Bars is simply irresistible. Imagine biting into a rich chocolate topping that melts in your mouth, followed by a creamy custard middle that’s both sweet and satisfying. The crumbly base adds a delightful crunch, creating a perfect balance that keeps you coming back for more. Each layer complements the others, making every bite a little piece of heaven.
What I love most about this recipe is its simplicity. Whether you’re a seasoned baker or a novice in the kitchen, you’ll find this recipe accessible and easy to follow. With just a handful of ingredients and straightforward steps, you can create a stunning dessert that will impress anyone who tries it. Plus, it’s a fantastic way to introduce your family and friends to a classic Canadian treat!
Ingredients You’ll Need for This Recipe
To create these delightful Nanaimo Bars, you’ll need a few simple ingredients that come together to form a delicious treat. Here’s what you’ll need:
- Graham Cracker Crumbs: The base for the bars, providing a sweet crunch that sets the stage for the layers above.
- Unsweetened Cocoa Powder: This adds a rich chocolate flavor, making each bite decadent and satisfying.
- Powdered Sugar: Sweetens both the base and custard layers, ensuring a delightful sweetness throughout.
- Unsweetened Shredded Coconut: Adds texture and a hint of tropical flavor, enhancing the overall experience.
- Unsalted Butter: Binds the base together and adds richness, making the bars melt in your mouth.
- Large Egg: Helps to hold the base together, providing structure to your bars.
- Vanilla Extract: Enhances the overall flavor, bringing warmth and depth to the dessert.
- Custard Powder: This is key for the creamy middle layer, giving it that signature custard taste.
- Milk: Helps achieve the right consistency for the custard, making it smooth and luscious.
- Semi-Sweet Chocolate: The topping that brings the dessert together, adding a rich finish to each bar.
For those looking to customize, consider using gluten-free graham crackers for a gluten-free version. You can also add chopped nuts or dried fruit to the base layer for added texture and flavor. The possibilities are endless!
How to Make the Perfect Nanaimo Bars – Canada
Making Nanaimo Bars is a delightful experience that brings the flavors of Canada right into your kitchen. With just a few simple steps, you can create this no-bake treat that’s perfect for busy days. Let’s dive into the process!
Step 1 – Prep Your Ingredients Quickly
Before you start, gather all your ingredients and tools. This will save you time and make the process smoother. You’ll need:
- Mixing bowls
- An 8-inch square baking pan
- A spatula for spreading
- A microwave-safe bowl for melting chocolate
Step 2 – Begin Cooking
In a medium bowl, combine the graham cracker crumbs, unsweetened cocoa powder, powdered sugar, shredded coconut, softened butter, egg, and vanilla extract. Mix until everything is well combined. The mixture should be moist and crumbly, like a sandy beach ready for building castles!
Step 3 – Combine Ingredients and Cook
Press the mixture firmly into the bottom of your greased baking pan. This base layer is the foundation of your Nanaimo Bars, so make sure it’s packed tightly. Next, in another bowl, beat together the softened butter, powdered sugar, custard powder, and milk until smooth and creamy. Spread this luscious custard mixture evenly over the graham cracker layer.
Step 4 – Final Touches & Serving Suggestions
For the topping, melt the chopped semi-sweet chocolate and butter together in your microwave-safe bowl. Do this in 30-second intervals, stirring in between until it’s silky smooth. Pour the melted chocolate over the custard layer and spread it evenly. Now, refrigerate the bars for at least 2 hours or until set. Once they’re firm, cut them into squares and serve. Enjoy the rich, layered flavors of your homemade Nanaimo Bars!
Expert Tips to Ensure Keto Cooking Success
As I’ve navigated the world of keto cooking, I’ve learned a few tricks that can elevate your Nanaimo Bars to the next level. Here are my top tips to ensure your baking experience is a success:
- Use High-Quality Chocolate: The chocolate topping is the crown jewel of your Nanaimo Bars. Opt for high-quality semi-sweet chocolate to enhance the flavor. It makes a world of difference!
- Allow Bars to Chill Thoroughly: Patience is key! Let your bars chill in the refrigerator for the full 2 hours. This not only helps them set properly but also makes cutting them into neat squares much easier.
- Experiment with Custard Powder Flavors: While vanilla is classic, don’t hesitate to try different flavors of custard powder. Chocolate or butterscotch can add a delightful twist to your bars!
- Consider Adding a Pinch of Salt: A small pinch of salt can enhance the sweetness of your bars, balancing the flavors beautifully. It’s a simple trick that can elevate your dessert!
By following these tips, you’ll not only create delicious Nanaimo Bars but also enjoy the process of making them. Happy baking!
Essential Kitchen Tools for This Nanaimo Bars Recipe
To make your Nanaimo Bars a success, having the right kitchen tools is essential. Here’s a list of the must-have items that will make your baking experience smooth and enjoyable:
- Mixing Bowls: A set of mixing bowls is crucial for combining your ingredients. I recommend having a few different sizes on hand to accommodate various steps in the recipe.
- 8-inch Square Baking Pan: This is the ideal size for your Nanaimo Bars. It ensures that the layers are perfectly proportioned and allows for even setting.
- Spatula: A good spatula is essential for spreading the layers evenly. It helps you achieve that smooth finish on your custard layer and makes transferring the bars easier.
- Microwave-Safe Bowl: You’ll need this for melting the chocolate and butter together. Choose a bowl that’s large enough to hold all the chocolate without spilling.
- Refrigerator: This is your best friend when it comes to setting the bars. Make sure you have enough space to chill your creation until it’s firm and ready to cut.
With these tools at your disposal, you’ll be well-equipped to whip up a batch of delicious Nanaimo Bars that will impress everyone!
Delicious Variations to Customize Your Nanaimo Bars
One of the best things about Nanaimo Bars is their versatility! You can easily customize this classic Canadian treat to suit your taste preferences or to use up ingredients you have on hand. Here are some delightful variations to consider:
- Add Chopped Nuts: For an extra crunch, consider mixing in some chopped nuts like walnuts or pecans into the base layer. This not only adds texture but also enhances the flavor profile, making each bite even more satisfying.
- Substitute Coconut: If coconut isn’t your thing, try substituting it with crushed cookies. This can give your Nanaimo Bars a different texture and flavor, making them uniquely yours. Think about using chocolate or vanilla wafers for a fun twist!
- Use Flavored Chocolate: Elevate your dessert by using flavored chocolate for the topping. Dark chocolate can add a rich, intense flavor, while white chocolate offers a sweet, creamy contrast. Experimenting with different chocolate types can lead to exciting new combinations!
These variations not only keep things interesting but also allow you to put your personal stamp on this beloved Canadian dessert. So, don’t hesitate to get creative and make these Nanaimo Bars your own!
Best Keto-Friendly Sides & Beverage Pairings
When it comes to enjoying your Nanaimo Bars, pairing them with the right sides and beverages can elevate your dessert experience. Here are some of my favorite keto-friendly options that complement the rich flavors of these Canadian treats:
- Coffee or Tea: A warm cup of coffee or tea is the perfect beverage to enjoy alongside your Nanaimo Bars. The rich, bold flavors of coffee enhance the chocolate topping, while a soothing cup of herbal tea can provide a calming contrast. Whether you prefer a robust espresso or a delicate chamomile, both options are delightful companions.
- Keto Ice Cream: For those who want to take their dessert to the next level, consider serving your Nanaimo Bars with a scoop of keto ice cream. The creamy texture and cool temperature of the ice cream create a wonderful contrast to the rich layers of the bars. Plus, there are so many delicious flavors to choose from!
- Fresh Berries: Light and refreshing, fresh berries are an excellent side to balance the richness of the Nanaimo Bars. Strawberries, raspberries, or blueberries add a burst of natural sweetness and a pop of color to your dessert plate. They also provide a dose of antioxidants, making your treat feel a little healthier!
These pairings not only enhance the enjoyment of your Nanaimo Bars but also create a delightful dessert experience that you can share with family and friends. So, grab your favorite beverage, add a scoop of ice cream, and don’t forget those fresh berries for a truly indulgent treat!
FAQs About Making Nanaimo Bars – Canada at Home
As I’ve shared my love for Nanaimo Bars, I often get questions from fellow home cooks eager to try this delightful Canadian treat. Here are some of the most frequently asked questions about making Nanaimo Bars at home:
- Can I make these bars gluten-free?
Yes, by using gluten-free graham crackers, you can easily adapt this recipe to fit your dietary needs without sacrificing flavor. - How long do Nanaimo Bars last?
They can be stored in the refrigerator for up to a week. Just make sure to keep them in an airtight container to maintain their freshness! - Can I freeze Nanaimo Bars?
Absolutely! Nanaimo Bars freeze well for up to three months. Just wrap them tightly in plastic wrap or place them in a freezer-safe container to keep them from getting freezer burn.
These FAQs should help you feel more confident as you embark on your Nanaimo Bars journey. Enjoy the process and the delicious results!
Final Thoughts on This Easy Keto-Friendly Nanaimo Bars Recipe
As you embark on your journey to create these delicious Nanaimo Bars at home, I encourage you to embrace the process and enjoy every moment. There’s something truly special about making a classic Canadian treat that not only satisfies your sweet tooth but also brings a sense of nostalgia and warmth.
Sharing these bars with family and friends is where the real joy lies. Imagine the smiles on their faces as they take their first bite, experiencing the rich chocolate topping, creamy custard middle, and crumbly base. It’s a delightful way to create memories and bond over a shared love for good food.
I’d love to hear about your experiences with this recipe! Have you tried any fun variations or made it your own? Please share your thoughts and creations in the comments below. Let’s celebrate the joy of baking together and inspire each other to keep exploring the wonderful world of desserts!
Print
Nanaimo Bars – Canada: Indulge in this Easy Recipe!
- Total Time: 2 hours 20 minutes
- Yield: 16 servings 1x
- Diet: Vegetarian
Description
Indulge in this easy recipe for Nanaimo Bars, a classic Canadian treat with a rich chocolate topping, creamy custard middle, and a crumbly base.
Ingredients
- 1 cup graham cracker crumbs
- 1/2 cup unsweetened cocoa powder
- 1/2 cup powdered sugar
- 1/2 cup unsweetened shredded coconut
- 1/2 cup unsalted butter, softened
- 1 large egg
- 1 teaspoon vanilla extract
- 1/2 cup unsalted butter, softened (for middle layer)
- 2 cups powdered sugar (for middle layer)
- 2 tablespoons vanilla custard powder (or instant vanilla pudding mix, for middle layer)
- 2 tablespoons milk (for middle layer)
- 4 ounces semi-sweet chocolate, chopped (for top layer)
- 2 tablespoons unsalted butter (for top layer)
Instructions
- In a medium bowl, combine graham cracker crumbs, cocoa powder, powdered sugar, shredded coconut, softened butter, egg, and vanilla extract. Mix until well combined.
- Press the mixture firmly into the bottom of a greased 8-inch square baking pan.
- In another bowl, beat together the softened butter, powdered sugar, custard powder, and milk until smooth and creamy.
- Spread this mixture evenly over the graham cracker layer in the pan.
- For the top layer, melt the chopped chocolate and butter together in a microwave-safe bowl in 30-second intervals, stirring in between until smooth.
- Pour the melted chocolate over the custard layer and spread evenly.
- Refrigerate the bars for at least 2 hours or until set.
- Once set, cut into squares and serve.
Notes
- For a gluten-free version, use gluten-free graham crackers.
- You can also add chopped nuts or dried fruit to the base layer for added texture and flavor.
- Prep Time: 20 minutes
- Cook Time: 0 minutes
- Category: Dessert
- Method: No-bake
- Cuisine: Canadian
Nutrition
- Serving Size: 1 bar
- Calories: 220
- Sugar: 25g
- Sodium: 0mg
- Fat: 12g
- Saturated Fat: 7g
- Unsaturated Fat: 0g
- Trans Fat: 0g
- Carbohydrates: 25g
- Fiber: 1g
- Protein: 2g
- Cholesterol: 20mg


