How to Make the Perfect Okonomiyaki
Making Okonomiyaki is a delightful experience that fills your kitchen with savory aromas. I love how this dish combines simplicity with flavor, making it perfect for busy weeknights. Let’s dive into the step-by-step process to create these delicious Japanese pancakes!
Step 1 – Prep Your Ingredients Quickly
Before you start cooking, gather all your ingredients. This not only saves time but also makes the cooking process smoother. Here’s how I do it:
- Measure out 2 cups of all-purpose flour and set it aside.
- Chop ½ cup of green onions and ¼ cup of pickled ginger if you’re using it.
- Finely shred 4 cups of cabbage. I find using a food processor speeds this up!
- Cook and chop your bacon or pork belly if you’re adding it.
Step 2 – Begin Cooking
Heat a non-stick skillet or griddle over medium heat. I always add a splash of vegetable oil to ensure the pancakes don’t stick. The oil should shimmer but not smoke—this is the sweet spot for cooking!
Step 3 – Combine Ingredients and Cook
In a large mixing bowl, whisk together the flour, dashi broth, and eggs until smooth. The batter should be thick yet pourable. Now, fold in the cabbage, green onions, and any optional ingredients like bacon or pickled ginger. Season with salt and pepper to taste.
Pour about 1 cup of the batter onto the skillet, spreading it into a round pancake shape about ½ inch thick. Cook for about 4-5 minutes until the bottom is golden brown. Carefully flip it over and cook for another 4-5 minutes. The aroma will be irresistible!
Step 4 – Final Touches & Serving Suggestions
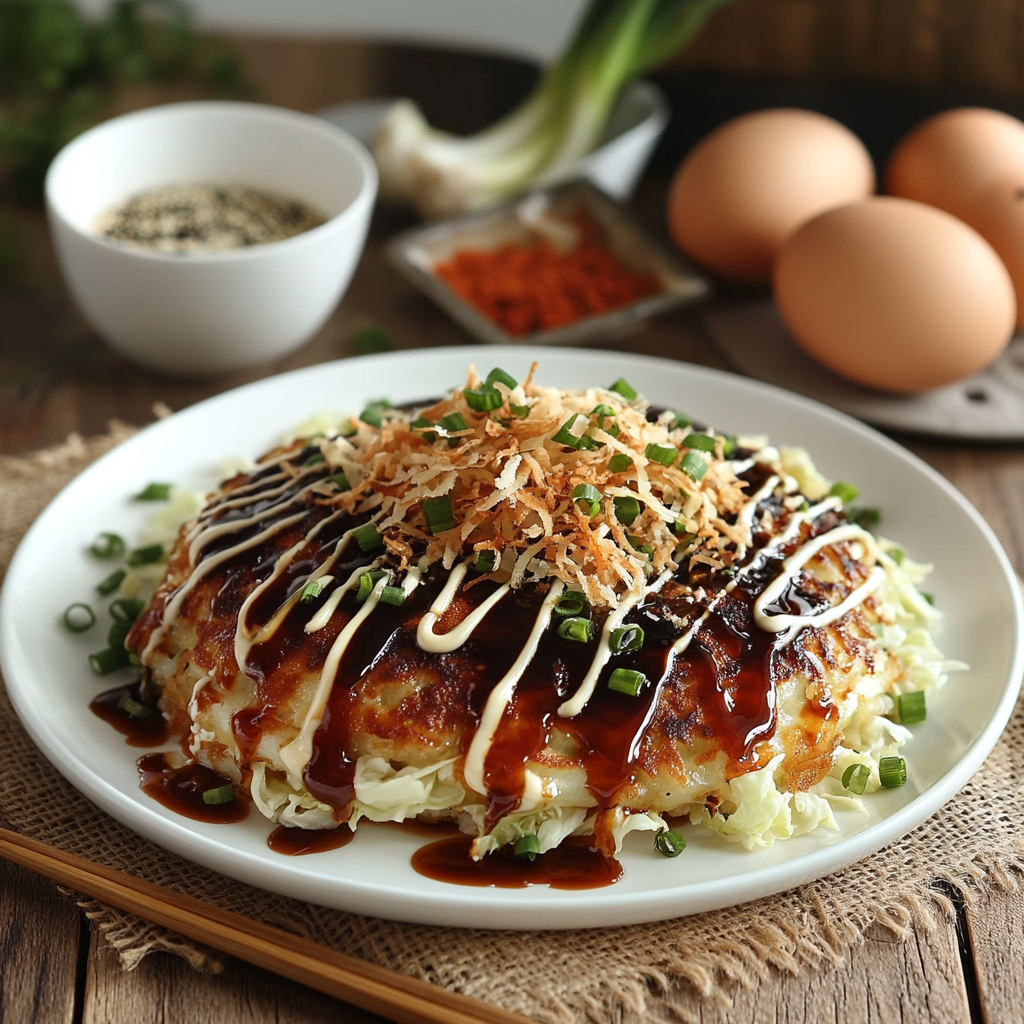
Once cooked, transfer the pancakes to a serving plate. Drizzle with okonomiyaki sauce and Japanese mayonnaise for that authentic touch. If you’re feeling fancy, sprinkle aonori and katsuobushi on top for added flavor and presentation. Your Okonomiyaki is now ready to be devoured!
Introduction to Okonomiyaki
Okonomiyaki is more than just a savory Japanese pancake; it’s a culinary hug that fits seamlessly into our busy lifestyles. As a home cook, I appreciate how this dish allows me to whip up a satisfying meal in no time, making it a staple in my kitchen. With its delightful combination of flavors and textures, Okonomiyaki is perfect for those hectic weeknights when you crave something delicious yet nutritious.
One of the best aspects of Okonomiyaki is its ability to pack in a variety of vegetables and protein. The finely shredded cabbage not only adds a satisfying crunch but also boosts the nutritional value of the meal. Incorporating ingredients like green onions and optional proteins such as bacon or pork belly means you’re not just filling your belly; you’re nourishing your body. This is especially important for health-conscious adults looking to maintain a balanced diet without sacrificing flavor.
In just 35 minutes, you can create a dish that’s not only quick to prepare but also incredibly satisfying. Whether you’re cooking for yourself or the whole family, Okonomiyaki is a versatile option that can be customized to suit everyone’s tastes. So, let’s embrace this delicious Japanese pancake and make it a regular feature in our meal rotations!
Why You’ll Love This Delicious Low-Carb Japanese Pancake Recipe
One of the best things about making Okonomiyaki at home is the sheer convenience it offers. With just a handful of ingredients, you can whip up a satisfying meal in under 35 minutes. I often find myself reaching for this recipe on busy weeknights when time is tight but my cravings for something delicious are high. The beauty of Okonomiyaki lies in its versatility; you can easily customize it with whatever vegetables or proteins you have on hand, making it a go-to for using up leftovers!
The delightful taste and texture of Okonomiyaki are what truly make it a family favorite. Each bite is a harmonious blend of savory flavors, with the crispy edges giving way to a tender, flavorful center. The combination of cabbage and green onions adds a refreshing crunch, while the optional bacon or pork belly brings a rich, satisfying depth. I can’t tell you how many times my family has gathered around the table, eagerly awaiting these pancakes, their eyes lighting up as the aroma fills the air.
What I love most about this recipe is its simplicity. Even if you’re a novice in the kitchen, you’ll find that making Okonomiyaki is straightforward and forgiving. The step-by-step instructions guide you through the process, ensuring that you can create a delicious dish without feeling overwhelmed. Plus, the ingredients are easy to find at your local grocery store, making it accessible for everyone. So, whether you’re a seasoned cook or just starting out, Okonomiyaki is a delightful recipe that invites you to explore the world of Japanese cuisine with confidence!
Ingredients You’ll Need for This Recipe
To create the perfect Okonomiyaki, you’ll need a few essential ingredients that come together to make this savory Japanese pancake a delight. Here’s a breakdown of what you’ll need:
- All-purpose flour: This serves as the base for the pancake, giving it structure and a satisfying texture.
- Dashi broth (or water): This ingredient adds a rich umami flavor, elevating the taste of your Okonomiyaki.
- Eggs: They bind all the ingredients together, ensuring a cohesive pancake that holds its shape.
- Cabbage: Finely shredded, it provides a delightful crunch and boosts the nutritional value of the dish.
- Green onions: These add a fresh, vibrant flavor that complements the other ingredients beautifully.
- Bacon or pork belly (optional): For those who enjoy a richer taste, this adds a savory depth to the pancakes.
- Pickled ginger (optional): A tangy kick that brightens the overall flavor profile of the dish.
- Seasoning: Salt and pepper to taste, enhancing the flavors of the other ingredients.
- Vegetable oil: Essential for cooking, it prevents sticking and helps achieve that golden-brown crust.
- Okonomiyaki sauce: This is a must-have for flavor, providing a sweet and savory glaze that ties everything together.
- Japanese mayonnaise: For drizzling, it adds a creamy richness that balances the savory elements.
- Aonori and katsuobushi (optional): These garnishes add a touch of umami and visual appeal, making your pancakes look as good as they taste.
Feel free to customize your Okonomiyaki by adding other vegetables or proteins based on your dietary preferences. For a vegetarian option, simply omit the bacon and use vegetable broth instead of dashi. The beauty of this dish lies in its versatility, allowing you to make it your own!
How to Make the Perfect Okonomiyaki
Making Okonomiyaki is a delightful experience that fills your kitchen with savory aromas. I love how this dish combines simplicity with flavor, making it perfect for busy weeknights. Let’s dive into the step-by-step process to create these delicious Japanese pancakes!
Step 1 – Prep Your Ingredients Quickly
Before you start cooking, gather all your ingredients. This not only saves time but also makes the cooking process smoother. Here’s how I do it:
- Measure out 2 cups of all-purpose flour and set it aside.
- Chop ½ cup of green onions and ¼ cup of pickled ginger if you’re using it.
- Finely shred 4 cups of cabbage. I find using a food processor speeds this up!
- Cook and chop your bacon or pork belly if you’re adding it.
Step 2 – Begin Cooking
Heat a non-stick skillet or griddle over medium heat. I always add a splash of vegetable oil to ensure the pancakes don’t stick. The oil should shimmer but not smoke—this is the sweet spot for cooking!
Step 3 – Combine Ingredients and Cook
In a large mixing bowl, whisk together the flour, dashi broth, and eggs until smooth. The batter should be thick yet pourable. Now, fold in the cabbage, green onions, and any optional ingredients like bacon or pickled ginger. Season with salt and pepper to taste.
Pour about 1 cup of the batter onto the skillet, spreading it into a round pancake shape about ½ inch thick. Cook for about 4-5 minutes until the bottom is golden brown. Carefully flip it over and cook for another 4-5 minutes. The aroma will be irresistible!
Step 4 – Final Touches & Serving Suggestions
Once cooked, transfer the pancakes to a serving plate. Drizzle with okonomiyaki sauce and Japanese mayonnaise for that authentic touch. If you’re feeling fancy, sprinkle aonori and katsuobushi on top for added flavor and presentation. Your Okonomiyaki is now ready to be devoured!
Expert Tips to Ensure Keto Cooking Success
As a passionate home cook, I’ve learned a few tricks to elevate my Okonomiyaki game. Here are my expert tips to ensure your keto cooking success with this delightful Japanese pancake:
- Use a non-stick skillet: This is essential for easy flipping. A good non-stick surface prevents the pancakes from sticking, allowing you to achieve that perfect golden-brown crust without the frustration of tearing.
- Adjust cooking time based on pancake thickness: If you prefer thicker pancakes, be prepared to cook them a bit longer. Keep an eye on the edges; when they start to look set, it’s time to flip!
- Experiment with different vegetables: Don’t hesitate to mix things up! Adding ingredients like bell peppers, zucchini, or even mushrooms can introduce new flavors and textures, making each batch unique.
- Ensure the batter is well-mixed: A well-mixed batter is key to even cooking. Make sure there are no lumps, and all ingredients are fully incorporated. This will help your pancakes cook uniformly and taste delicious!
By following these tips, you’ll not only master the art of making Okonomiyaki but also enjoy a satisfying, keto-friendly meal that your whole family will love!
Essential Kitchen Tools for This Keto Recipe
To make your Okonomiyaki experience as smooth as possible, having the right kitchen tools is essential. Here’s a list of the necessary tools you’ll need:
- Non-stick skillet or griddle: This is crucial for cooking your pancakes evenly and preventing them from sticking. If you don’t have a non-stick option, a well-seasoned cast-iron skillet can work as a great alternative.
- Mixing bowls: A couple of mixing bowls in different sizes will help you combine your ingredients easily. If you’re short on space, a large measuring cup can double as a mixing bowl.
- Whisk or spatula: A whisk is perfect for mixing the batter until smooth, while a spatula is essential for flipping your pancakes. If you don’t have a whisk, a fork can do the trick in a pinch!
- Measuring cups and spoons: Accurate measurements are key to achieving the perfect pancake. If you’re in a hurry, you can use a kitchen scale for precise ingredient amounts.
With these tools at your disposal, you’ll be well-equipped to create delicious Okonomiyaki right in your kitchen!
Delicious Variations to Customize Your Japanese Pancake
One of the best things about Okonomiyaki is its versatility. You can easily customize this savory Japanese pancake to suit your taste preferences and dietary needs. Here are some delicious variations to consider:
- Vegetarian option: For a meat-free version, simply omit the bacon or pork belly and use vegetable broth instead of dashi. This still provides a rich flavor while keeping it plant-based.
- Add-ins: Get creative by incorporating other vegetables! Sweet corn, colorful bell peppers, or earthy mushrooms can add extra flavor and texture to your Okonomiyaki. Each addition brings a unique twist to the dish.
- Gluten-free option: If you’re following a gluten-free diet, you can substitute the all-purpose flour with a gluten-free flour blend. This allows you to enjoy the same delicious taste without the gluten.
These variations not only enhance the flavor but also make Okonomiyaki a dish that everyone can enjoy, regardless of dietary restrictions. So, feel free to experiment and make this recipe your own!
Best Keto-Friendly Sides & Beverage Pairings
To elevate your Okonomiyaki experience, consider pairing it with some delicious keto-friendly sides and beverages. These options not only complement the savory flavors of the pancakes but also keep your meal balanced and satisfying. Here are my top suggestions:
- Cucumber salad with sesame dressing: This refreshing salad adds a crunchy contrast to the warm pancakes. The sesame dressing brings a nutty flavor that perfectly complements the Okonomiyaki.
- Miso soup: A light and comforting side, miso soup is a classic Japanese dish that pairs beautifully with Okonomiyaki. Its umami flavor enhances the overall meal experience.
- Green tea: This traditional beverage is not only refreshing but also packed with antioxidants. Its subtle flavor won’t overpower the pancakes, making it a perfect match.
- Sparkling water: For a fizzy option, sparkling water is a great choice. You can add a slice of lemon or lime for a zesty twist that cleanses the palate between bites.
These sides and beverages will not only enhance your Okonomiyaki meal but also keep it aligned with your keto lifestyle. Enjoy your culinary adventure!
FAQs About Making Okonomiyaki at Home
As you embark on your Okonomiyaki journey, you might have a few questions. Here are some common queries I’ve encountered, along with my answers to help you make the most of this delicious dish!
- What is the best way to store leftover Okonomiyaki?
To store leftover Okonomiyaki, let it cool completely, then wrap it tightly in plastic wrap or place it in an airtight container. It can be refrigerated for up to 3 days. When you’re ready to enjoy it again, simply reheat it in a skillet over medium heat until warmed through. - Can I make Okonomiyaki ahead of time?
Yes, you can prepare the batter ahead of time! Mix the ingredients and store the batter in the refrigerator for up to 24 hours. Just give it a good stir before cooking. However, I recommend cooking the pancakes fresh for the best texture and flavor. - What are some common toppings for Okonomiyaki?
Common toppings for Okonomiyaki include okonomiyaki sauce, Japanese mayonnaise, aonori (dried seaweed flakes), and katsuobushi (bonito flakes). You can also add sliced green onions or even a sprinkle of sesame seeds for extra flavor! - How can I make this dish spicier?
If you’re looking to add some heat to your Okonomiyaki, consider mixing in some chopped chili peppers or a dash of sriracha into the batter. You can also drizzle spicy mayo on top for an extra kick!
These FAQs should help you navigate your Okonomiyaki-making experience with confidence. Enjoy the process and the delicious results!
Final Thoughts on This Easy Keto-Friendly Okonomiyaki
As I wrap up this journey into the world of Okonomiyaki, I can’t help but feel excited for you to try making this delightful dish at home. The beauty of Okonomiyaki lies not only in its delicious flavors but also in its versatility. Whether you’re a busy professional or a parent juggling multiple responsibilities, this savory Japanese pancake is a fantastic option that can be tailored to fit your lifestyle.
Imagine gathering around the table with family or friends, sharing stories and laughter while enjoying these warm, satisfying pancakes. It’s a meal that brings people together, and I truly believe that cooking can be a joyful experience, even on the busiest of days. So, don’t hesitate to experiment with different ingredients and toppings to make this dish your own!
I would love to hear about your Okonomiyaki adventures! Have you tried any unique variations or discovered new flavor combinations? Please share your experiences and tips in the comments below. Let’s inspire each other to embrace the joy of cooking and savor the deliciousness of homemade Okonomiyaki!
Print
Okonomiyaki: Discover the Secret to Perfect Pancakes!
- Total Time: 35 minutes
- Yield: 4 servings 1x
- Diet: Vegetarian
Description
Savory Japanese Pancake
Ingredients
- 2 cups all-purpose flour
- 1 ½ cups dashi broth (or water)
- 2 large eggs
- 4 cups finely shredded cabbage
- ½ cup green onions, chopped
- ½ cup cooked and chopped bacon or pork belly (optional)
- ¼ cup pickled ginger, chopped (optional)
- Salt and pepper to taste
- Vegetable oil for cooking
- Okonomiyaki sauce (store-bought or homemade)
- Japanese mayonnaise (for drizzling)
- Aonori (dried seaweed flakes) for garnish (optional)
- Katsuobushi (bonito flakes) for garnish (optional)
Instructions
- In a large mixing bowl, whisk together the flour, dashi broth, and eggs until smooth.
- Fold in the shredded cabbage, green onions, cooked bacon or pork belly (if using), and pickled ginger. Season with salt and pepper to taste.
- Heat a non-stick skillet or griddle over medium heat and add a little vegetable oil.
- Pour about 1 cup of the batter onto the skillet, spreading it into a round pancake shape about ½ inch thick.
- Cook for about 4-5 minutes until the bottom is golden brown, then carefully flip it over and cook for another 4-5 minutes on the other side.
- Repeat with the remaining batter, adding more oil to the skillet as needed.
- Once cooked, transfer the pancakes to a serving plate. Drizzle with okonomiyaki sauce and Japanese mayonnaise, and sprinkle with aonori and katsuobushi if desired.
Notes
- For a vegetarian option, omit the bacon and use vegetable broth instead of dashi.
- Try adding other vegetables like corn, bell peppers, or mushrooms for extra flavor and texture.
- Prep Time: 15 minutes
- Cook Time: 20 minutes
- Category: Main Dish
- Method: Pan-frying
- Cuisine: Japanese
Nutrition
- Serving Size: 1 pancake
- Calories: 300
- Sugar: 1g
- Sodium: 500mg
- Fat: 12g
- Saturated Fat: 3g
- Unsaturated Fat: 9g
- Trans Fat: 0g
- Carbohydrates: 35g
- Fiber: 2g
- Protein: 10g
- Cholesterol: 100mg