





How to Make the Perfect Bingsu
Making Bingsu at home is a delightful experience that brings a taste of South Korea right to your kitchen. With just a few simple steps, you can create this refreshing dessert that’s perfect for hot summer days or any time you crave something sweet. Let’s dive into the process!
Step 1 – Prep Your Ingredients Quickly
First things first, you’ll want to crush the ice until it resembles fine snow. I find that using a blender works wonders, but if you have an ice shaver, that’s even better! The goal is to achieve a fluffy texture that will hold all the delicious toppings.
Step 2 – Begin Cooking
Next, grab a serving bowl and layer the crushed ice to create a beautiful mound. This is where the magic begins! The fluffy ice serves as the perfect canvas for all the tasty toppings you’ll add later.
Step 3 – Combine Ingredients and Cook
Now comes the fun part! Drizzle the sweetened condensed milk generously over the top of your ice mound. Watch as it seeps into the ice, creating a creamy delight. Then, arrange your diced fresh fruit on top. If you’re feeling adventurous, add dollops of red bean paste and sprinkle some mochi pieces for that authentic touch.
Step 4 – Final Touches & Serving Suggestions
To finish off your Bingsu masterpiece, sprinkle crushed nuts over the entire dessert for that satisfying crunch. If you want to elevate the flavor, dust the top with matcha powder. Finally, garnish with fresh mint leaves for a pop of color and freshness. Serve immediately and enjoy the delightful combination of textures and flavors!
Introduction to Bingsu – South Korea
Bingsu, a beloved Korean dessert, is more than just a sweet treat; it’s a cultural experience that captures the essence of summer in South Korea. Imagine a mountain of finely shaved ice, topped with vibrant fruits and drizzled with sweetened condensed milk, creating a refreshing delight that dances on your taste buds. This dessert is not only visually stunning but also incredibly satisfying, making it a popular choice among locals and visitors alike.
For busy health-conscious adults like us, Bingsu offers a quick escape from the daily grind. With its customizable toppings, you can easily adapt it to fit your dietary preferences while still enjoying a delightful dessert. Whether you’re looking to cool down on a hot day or impress guests at a gathering, Bingsu is the perfect solution. It’s a simple yet elegant way to indulge without the guilt, making it a must-try for anyone seeking a delicious and refreshing treat!
Why You’ll Love This Delicious Low-Carb Korean Shaved Ice Recipe
One of the best things about making Bingsu at home is the sheer convenience it offers. On a sweltering summer day, there’s nothing quite like a refreshing bowl of this Korean shaved ice to cool you down. In just 10 minutes, you can whip up a delightful dessert that’s not only easy to prepare but also a crowd-pleaser for gatherings. Imagine serving this colorful treat at your next barbecue or family get-together—everyone will be raving about it!
What truly sets Bingsu apart is its incredible versatility. You can customize it to suit your taste buds and dietary preferences. Whether you’re a fan of tropical flavors or prefer classic combinations, the options are endless. Want to keep it low-carb? Opt for fresh berries and skip the sweetened condensed milk in favor of a sugar-free alternative. Feeling adventurous? Try adding unique toppings like matcha powder or even a drizzle of sugar-free chocolate syrup. The beauty of Bingsu lies in its adaptability, making it a delightful treat for everyone, regardless of their dietary needs.
Ingredients You’ll Need for This Recipe
To create the perfect Bingsu, you’ll need a few essential ingredients that come together to make this delightful Korean shaved ice dessert. Here’s what you’ll need:
- Ice: The base for the dessert, creating a refreshing texture that’s light and fluffy.
- Sweetened Condensed Milk: This ingredient adds a rich creaminess and sweetness that perfectly complements the ice.
- Fresh Fruit: Choose your favorites! Fresh fruit offers natural sweetness and vibrant flavors, making each bite a burst of freshness.
- Red Bean Paste (optional): A traditional topping that adds a unique richness and depth of flavor.
- Mochi Pieces (optional): These chewy delights provide a fun texture that pairs beautifully with the ice.
- Crushed Nuts: Adding a sprinkle of crushed nuts gives your Bingsu a satisfying crunch and enhances the overall flavor.
- Matcha Powder (optional): For those who enjoy a unique flavor twist, matcha powder adds a beautiful color and earthy taste.
- Mint Leaves: Use these for garnish to add a touch of freshness and a pop of color to your dessert.
Don’t worry about memorizing everything right now! Exact measurements will be provided at the end of the recipe for your convenience.
How to Make the Perfect Bingsu
Making Bingsu at home is a delightful experience that brings a taste of South Korea right to your kitchen. With just a few simple steps, you can create this refreshing dessert that’s perfect for hot summer days or any time you crave something sweet. Let’s dive into the process!
Step 1 – Prep Your Ingredients Quickly
First things first, you’ll want to crush the ice until it resembles fine snow. I find that using a blender works wonders, but if you have an ice shaver, that’s even better! The goal is to achieve a fluffy texture that will hold all the delicious toppings. As you crush the ice, listen for that satisfying crunch—it’s the sound of summer in your kitchen!
Step 2 – Begin Cooking
Next, grab a serving bowl and layer the crushed ice to create a beautiful mound. This is where the magic begins! The fluffy ice serves as the perfect canvas for all the tasty toppings you’ll add later. Make sure to pack the ice gently; you want it to be light and airy, not dense.
Step 3 – Combine Ingredients and Cook
Now comes the fun part! Drizzle the sweetened condensed milk generously over the top of your ice mound. Watch as it seeps into the ice, creating a creamy delight. Then, arrange your diced fresh fruit on top. If you’re feeling adventurous, add dollops of red bean paste and sprinkle some mochi pieces for that authentic touch. The colors and textures will make your heart sing!
Step 4 – Final Touches & Serving Suggestions
To finish off your Bingsu masterpiece, sprinkle crushed nuts over the entire dessert for that satisfying crunch. If you want to elevate the flavor, dust the top with matcha powder. Finally, garnish with fresh mint leaves for a pop of color and freshness. Serve immediately and enjoy the delightful combination of textures and flavors!
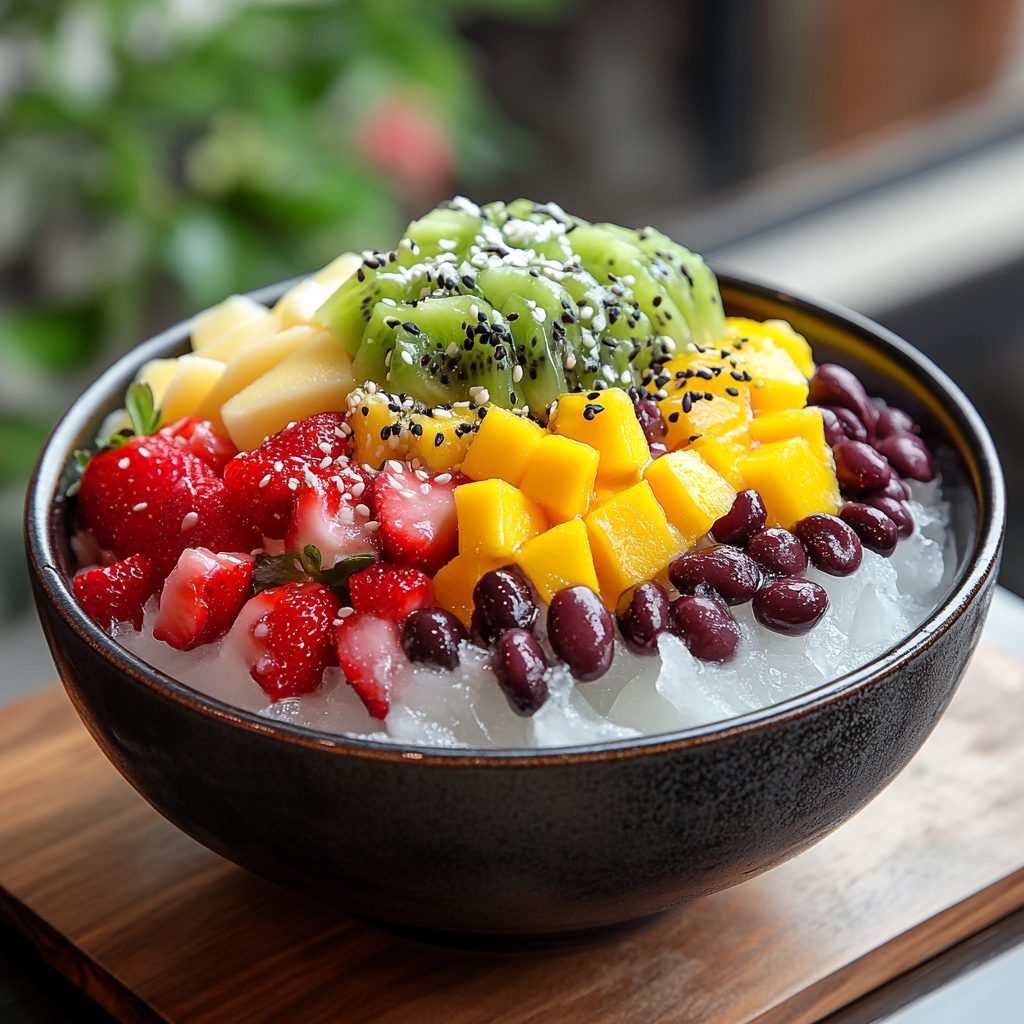
Expert Tips to Ensure Keto Cooking Success
Creating the perfect Bingsu is not just about following the recipe; it’s about making it your own! Here are some expert tips to ensure your Bingsu turns out delicious every time:
- Use Fresh, Seasonal Fruits: Opt for fruits that are in season for the best flavor. Strawberries, mangoes, and kiwis not only taste amazing but also add vibrant colors to your dessert.
- Experiment with Different Toppings: Don’t be afraid to get creative! Try adding unique toppings like shredded coconut, chocolate chips, or even a drizzle of sugar-free syrup to suit your personal preferences.
- For a Creamier Texture: If you’re looking for a richer mouthfeel, consider substituting half of the sweetened condensed milk with coconut milk. This not only enhances the creaminess but also adds a delightful tropical twist!
By incorporating these tips, you’ll elevate your Bingsu experience and impress your family and friends with your culinary skills. Enjoy the process and have fun experimenting!
Essential Kitchen Tools for This Korean Dessert
To create the perfect Bingsu, having the right kitchen tools can make all the difference. Here’s a list of essential tools you’ll need, along with some alternatives:
- Ice Shaver or Blender: An ice shaver is ideal for achieving that fine, fluffy texture, but a high-powered blender can work just as well for crushing ice.
- Serving Bowls: Choose bowls that are wide and shallow for a beautiful presentation of your Bingsu masterpiece.
- Measuring Cups: Accurate measurements are key to perfecting your recipe, so have a set of measuring cups handy for portioning your ingredients.
With these tools in your kitchen arsenal, you’ll be well-equipped to whip up a delightful Bingsu that will impress everyone!
Delicious Variations to Customize Your Bingsu
One of the most exciting aspects of making Bingsu is the endless possibilities for customization! Whether you’re in the mood for something tropical, indulgent, or plant-based, there’s a variation for everyone. Here are some delicious ideas to inspire your next Bingsu creation:
- Tropical Bingsu: For a taste of paradise, top your shaved ice with diced mango and shredded coconut. The sweetness of the mango combined with the chewy texture of coconut will transport you straight to a beachside getaway!
- Chocolate Bingsu: If you have a sweet tooth, this variation is for you! Drizzle chocolate syrup over the ice and sprinkle with colorful sprinkles for a fun and decadent treat. It’s like a party in a bowl!
- Vegan Bingsu: To make a plant-based version, simply substitute the sweetened condensed milk with your favorite plant-based milk, such as almond or coconut milk. Top it off with fresh fruits like berries and bananas for a refreshing and guilt-free dessert.
Feel free to mix and match these ideas or come up with your own unique combinations! The beauty of Bingsu lies in its versatility, allowing you to create a dessert that perfectly suits your taste and dietary preferences. Enjoy the creative process and have fun experimenting!
Best Keto-Friendly Sides & Beverage Pairings
When enjoying your delightful Bingsu, pairing it with the right sides and beverages can elevate your experience even further. Here are some easy, keto-friendly options that complement the refreshing flavors of this Korean shaved ice dessert:
- Light Salads with Sesame Dressing: A crisp salad tossed with a light sesame dressing provides a refreshing contrast to the sweetness of Bingsu. Think of a mix of greens, cucumbers, and radishes, all drizzled with a nutty sesame vinaigrette. It’s a perfect way to balance out the dessert!
- Sparkling Water with Lime: For a refreshing drink, nothing beats a glass of sparkling water with a squeeze of fresh lime. The effervescence and zesty flavor cleanse your palate and keep you feeling refreshed, making it an ideal companion to your Bingsu.
- Low-Carb Snacks like Cheese Crisps or Veggie Sticks: If you’re looking for a crunchy snack to enjoy alongside your dessert, consider cheese crisps or fresh veggie sticks. They provide a satisfying crunch without the carbs, making them a great choice to nibble on while savoring your Bingsu.
These keto-friendly sides and beverages not only enhance your Bingsu experience but also keep your meal balanced and enjoyable. So, go ahead and indulge in this delightful dessert while keeping your health goals in check!
FAQs About Making Bingsu at Home
As you embark on your Bingsu-making journey, you might have a few questions. Here are some common queries I’ve encountered, along with helpful answers to guide you:
- Can I make Bingsu without an ice shaver? Absolutely! If you don’t have an ice shaver, a high-powered blender works just as well. Simply crush the ice until it resembles fine snow. The key is to achieve that fluffy texture that makes Bingsu so delightful.
- What fruits work best for Bingsu? The beauty of Bingsu lies in its versatility! Fresh fruits like strawberries, mangoes, kiwis, and blueberries are fantastic choices. They not only add natural sweetness but also vibrant colors that make your dessert visually appealing.
- How can I store leftover Bingsu? While Bingsu is best enjoyed fresh, if you have leftovers, store them in an airtight container in the freezer. However, keep in mind that the texture may change once frozen. When you’re ready to enjoy it again, simply let it sit at room temperature for a few minutes before serving.
These FAQs should help you navigate the process of making Bingsu at home with confidence. Enjoy the experience and have fun creating your own delicious variations!
Final Thoughts on This Easy Keto-Friendly Bingsu
As I reflect on the joy of making Bingsu at home, I can’t help but smile at the memories created around this delightful dessert. Each bowl is not just a treat; it’s an experience that brings friends and family together, sharing laughter and stories over a refreshing, colorful creation. The beauty of Bingsu lies in its simplicity and versatility, allowing you to customize it to your heart’s content.
I encourage you to try this easy keto-friendly Bingsu recipe and make it your own! Experiment with different fruits, toppings, and flavors that resonate with your taste buds. Whether you’re enjoying it on a hot summer day or serving it at a gathering, I promise it will be a hit. Don’t forget to share your experiences and variations with me—I’d love to hear how you’ve made this Korean shaved ice dessert uniquely yours. Together, let’s celebrate the joy of cooking and the deliciousness of Bingsu!
Print
Bingsu – South Korea: Discover the Ultimate Recipe!
- Total Time: 10 minutes
- Yield: 4 servings 1x
- Diet: Vegetarian
Description
Korean Shaved Ice Delight
Ingredients
- 2 cups of ice
- 1 cup of sweetened condensed milk
- 1 cup of fresh fruit (such as strawberries, mangoes, or kiwi), diced
- 1/2 cup of red bean paste (optional)
- 1/4 cup of mochi pieces (optional)
- 1/4 cup of crushed nuts (such as almonds or peanuts)
- 1 tablespoon of matcha powder (optional)
- Mint leaves for garnish (optional)
Instructions
- Begin by crushing the ice until it resembles fine snow. You can use a blender or an ice shaver for this step.
- In a serving bowl, layer the crushed ice to create a mound.
- Drizzle the sweetened condensed milk over the top of the ice mound, allowing it to soak in slightly.
- Arrange the diced fresh fruit on top of the ice. If using, add dollops of red bean paste and sprinkle mochi pieces over the fruit.
- For added texture, sprinkle crushed nuts over the entire dessert.
- If you like, dust the top with matcha powder for a unique flavor twist.
- Garnish with mint leaves if desired, and serve immediately.
Notes
- For a creamier version, substitute half of the sweetened condensed milk with coconut milk.
- You can customize the toppings based on seasonal fruits or your personal favorites, such as chocolate syrup or sprinkles.
- Prep Time: 10 minutes
- Cook Time: 0 minutes
- Category: Dessert
- Method: No-cook
- Cuisine: Korean
Nutrition
- Serving Size: 1 serving
- Calories: 250
- Sugar: 20g
- Sodium: 50mg
- Fat: 5g
- Saturated Fat: 2g
- Unsaturated Fat: 3g
- Trans Fat: 0g
- Carbohydrates: 35g
- Fiber: 1g
- Protein: 5g
- Cholesterol: 10mg


