





How to Make the Perfect Bibimbap
Making Bibimbap is a delightful journey that combines vibrant colors and rich flavors. I love how this dish allows me to express my creativity in the kitchen while keeping it simple. Let’s dive into the step-by-step process of crafting this delicious bowl!
Step 1 – Prep Your Ingredients Quickly
Before you start cooking, it’s essential to have all your ingredients prepped and ready. This not only saves time but also ensures a smooth cooking experience. I recommend blanching the spinach and bean sprouts in boiling water for just 1-2 minutes. This quick method retains their vibrant colors and nutrients. While they cool, julienne your carrots and zucchini, and slice the shiitake mushrooms. Having everything ready makes the cooking process feel like a breeze!
Step 2 – Begin Cooking
In a large skillet, heat 1 tablespoon of vegetable oil over medium heat. Add the julienned zucchini and carrots, sautéing them for about 3-4 minutes until they’re tender yet still crisp. The aroma of sautéing vegetables is simply irresistible! Season them with a pinch of salt to enhance their natural flavors. Once done, remove them from the skillet and set aside.
Step 3 – Combine Ingredients and Cook
Now, in the same skillet, add another tablespoon of vegetable oil and toss in the shiitake mushrooms. Sauté for about 3-4 minutes until they soften and release their umami goodness. This layering of flavors is what makes Bibimbap so special! Remember to season with salt to taste. Once cooked, set the mushrooms aside with the other vegetables.
Step 4 – Final Touches & Serving Suggestions
In a non-stick skillet, fry the eggs sunny-side up over medium heat. I love the way the golden yolk glistens, ready to burst over the colorful vegetables. To assemble your Bibimbap, divide the cooked rice among four bowls. Arrange the sautéed zucchini, carrots, mushrooms, spinach, and bean sprouts in sections on top of the rice. Finally, place a fried egg on each bowl, drizzle with sesame oil, and sprinkle with sesame seeds and chopped green onions. Serve with gochujang on the side, allowing everyone to customize their spice level!
Introduction to Bibimbap
Welcome to the world of Bibimbap, a vibrant and flavorful Korean dish that has captured my heart and taste buds! This delightful rice bowl is a colorful medley of fresh vegetables, a perfectly fried egg, and a spicy kick from gochujang. It’s not just a meal; it’s an experience that brings together a symphony of flavors and textures.
As a busy home cook, I appreciate how Bibimbap fits seamlessly into my hectic lifestyle. With a total prep and cook time of just 35 minutes, it’s a quick yet nutritious option that doesn’t compromise on taste. The balance of protein, healthy fats, and fiber makes it a satisfying choice for lunch or dinner, keeping me energized throughout the day.
One of the best things about Bibimbap is its versatility. You can easily customize it to suit your dietary preferences, whether you’re vegetarian, keto, or looking to add some protein. From swapping out vegetables to adding grilled chicken or tofu, the possibilities are endless. This dish truly caters to everyone, making it a perfect centerpiece for family dinners or meal prep for the week ahead.
Why You’ll Love This Delicious Low-Carb Rice Bowl Recipe
If you’re looking for a quick and satisfying meal, Bibimbap is your answer! This delightful dish can be prepared in under 35 minutes, making it perfect for busy weeknights. I often find myself racing against the clock, and this recipe allows me to whip up something nutritious without sacrificing flavor.
The rich flavors and textures of Bibimbap are what truly set it apart. Each bite is a harmonious blend of sautéed vegetables, a runny fried egg, and the spicy kick of gochujang. The contrast between the tender veggies and the crispy rice creates a delightful experience that keeps me coming back for more. It’s like a party in a bowl!
What I love most about this recipe is its simplicity. Even if you’re a novice in the kitchen, you’ll find that making Bibimbap is straightforward and enjoyable. The step-by-step instructions guide you through the process, ensuring that you can create a beautiful and delicious meal with ease. Plus, the vibrant colors of the ingredients make it visually appealing, turning your dinner into a feast for the eyes!
Ingredients You’ll Need for This Recipe
To create a delicious bowl of Bibimbap, you’ll need a variety of fresh ingredients that come together to form a vibrant and flavorful dish. Here’s what you’ll need:
- 2 cups cooked white rice (base of the dish) – This serves as the hearty foundation for your Bibimbap, providing a satisfying texture.
- 1 cup spinach, blanched and chopped (nutrient boost) – Packed with vitamins, spinach adds a fresh, earthy flavor.
- 1 cup bean sprouts, blanched (crunchy texture) – These little gems bring a delightful crunch and a hint of sweetness.
- 1 cup carrots, julienned (sweetness and color) – Their vibrant orange hue and natural sweetness brighten up the dish.
- 1 cup zucchini, julienned (freshness) – Zucchini adds a refreshing taste and complements the other vegetables beautifully.
- 1 cup shiitake mushrooms, sliced (umami flavor) – These mushrooms provide a rich, savory depth that enhances the overall flavor profile.
- 2 tablespoons vegetable oil (for sautéing) – Essential for cooking the vegetables to perfection.
- 4 large eggs (protein source) – A fried egg on top adds creaminess and a boost of protein.
- 4 tablespoons gochujang (spicy kick) – This Korean chili paste brings heat and a unique flavor that ties everything together.
- 2 teaspoons sesame oil (aromatic finish) – A drizzle of sesame oil adds a nutty aroma that elevates the dish.
- 1 tablespoon sesame seeds (garnish) – These seeds add a delightful crunch and a touch of elegance.
- Salt, to taste (enhances flavors) – A pinch of salt is crucial for bringing out the natural flavors of the ingredients.
- Green onions, chopped (for garnish) – Fresh green onions add a pop of color and a mild onion flavor.
Feel free to customize your Bibimbap with optional ingredients! You can add sliced grilled chicken, beef, or tofu for extra protein. Experimenting with different vegetables like bell peppers or radishes can also enhance the dish’s color and flavor.
For your convenience, exact measurements will be provided at the end of this recipe for easy printing!
How to Make the Perfect Bibimbap
Making Bibimbap is a delightful journey that combines vibrant colors and rich flavors. I love how this dish allows me to express my creativity in the kitchen while keeping it simple. Let’s dive into the step-by-step process of crafting this delicious bowl!
Step 1 – Prep Your Ingredients Quickly
Before you start cooking, it’s essential to have all your ingredients prepped and ready. This not only saves time but also ensures a smooth cooking experience. I recommend blanching the spinach and bean sprouts in boiling water for just 1-2 minutes. This quick method retains their vibrant colors and nutrients. While they cool, julienne your carrots and zucchini, and slice the shiitake mushrooms. Having everything ready makes the cooking process feel like a breeze!
Step 2 – Begin Cooking
In a large skillet, heat 1 tablespoon of vegetable oil over medium heat. Add the julienned zucchini and carrots, sautéing them for about 3-4 minutes until they’re tender yet still crisp. The aroma of sautéing vegetables is simply irresistible! Season them with a pinch of salt to enhance their natural flavors. Once done, remove them from the skillet and set aside.
Step 3 – Combine Ingredients and Cook
Now, in the same skillet, add another tablespoon of vegetable oil and toss in the shiitake mushrooms. Sauté for about 3-4 minutes until they soften and release their umami goodness. This layering of flavors is what makes Bibimbap so special! Remember to season with salt to taste. Once cooked, set the mushrooms aside with the other vegetables.
Step 4 – Final Touches & Serving Suggestions
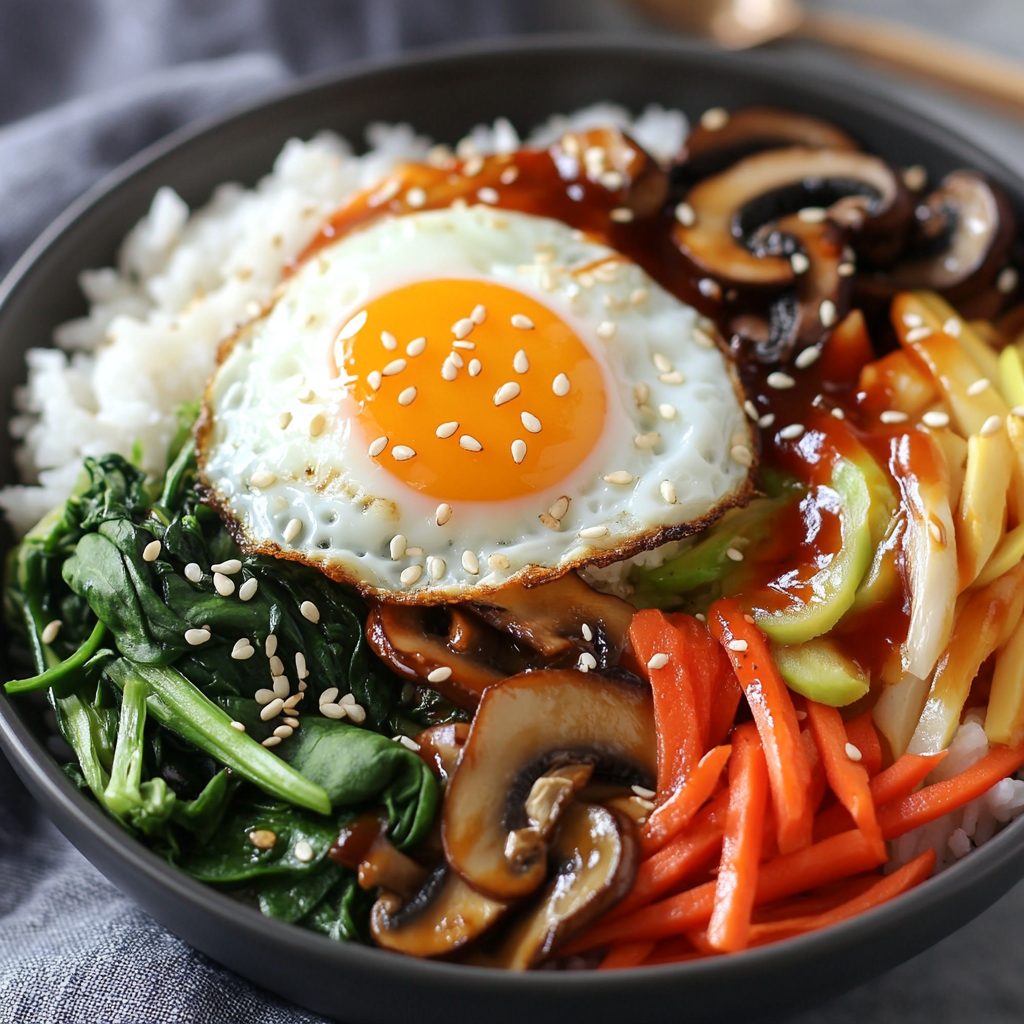
In a non-stick skillet, fry the eggs sunny-side up over medium heat. I love the way the golden yolk glistens, ready to burst over the colorful vegetables. To assemble your Bibimbap, divide the cooked rice among four bowls. Arrange the sautéed zucchini, carrots, mushrooms, spinach, and bean sprouts in sections on top of the rice. Finally, place a fried egg on each bowl, drizzle with sesame oil, and sprinkle with sesame seeds and chopped green onions. Serve with gochujang on the side, allowing everyone to customize their spice level!
Expert Tips to Ensure Keto Cooking Success
Creating the perfect Bibimbap is all about attention to detail and a few handy tips. Here are some expert suggestions that I’ve gathered over my cooking adventures to help you achieve a delicious and satisfying dish:
- Use day-old rice for better texture: If you have leftover rice from a previous meal, use it! Day-old rice has a firmer texture, which prevents it from becoming mushy when sautéed.
- Adjust cooking times based on vegetable freshness: Fresh vegetables may require less cooking time. Keep an eye on them to ensure they remain crisp and vibrant.
- Experiment with different proteins for added variety: Don’t hesitate to mix things up! Try adding sliced grilled chicken, beef, or tofu to cater to your taste preferences and dietary needs.
These tips will not only enhance the flavor of your Bibimbap but also make the cooking process smoother and more enjoyable. Happy cooking!
Essential Kitchen Tools for This Korean Recipe
To create a delicious Bibimbap, having the right kitchen tools on hand can make all the difference. Here’s a list of essential tools that I find invaluable when preparing this vibrant dish:
- Large skillet (for sautéing) – A sturdy skillet is perfect for cooking the vegetables evenly and achieving that delightful sautéed flavor.
- Non-stick skillet (for frying eggs) – This ensures your eggs cook perfectly without sticking, allowing for that beautiful sunny-side-up finish.
- Pot (for blanching vegetables) – A medium-sized pot is ideal for quickly blanching your spinach and bean sprouts, keeping them vibrant and crisp.
- Cutting board and knife (for prep) – A good cutting board and a sharp knife are essential for efficiently chopping and julienning your vegetables.
If you don’t have a non-stick skillet, a well-seasoned cast-iron skillet can also work wonders for frying eggs. Just be sure to keep an eye on the heat to prevent sticking. Happy cooking!
Delicious Variations to Customize Your Bibimbap
One of the best aspects of Bibimbap is its incredible versatility. You can easily tailor this dish to suit your taste preferences and dietary needs. Here are some delicious variations to consider:
- Add sliced grilled chicken, beef, or tofu for protein: If you’re looking to boost the protein content of your Bibimbap, consider adding sliced grilled chicken or beef. For a vegetarian option, tofu is a fantastic choice. Simply marinate your protein of choice in a bit of soy sauce and sesame oil before grilling or sautéing for added flavor.
- Experiment with different vegetables: While the classic Bibimbap includes zucchini, carrots, and spinach, feel free to get creative! Bell peppers, radishes, or even roasted sweet potatoes can add unique flavors and textures. The key is to use fresh, seasonal vegetables that you enjoy.
- Offer a vegan version: If you’re following a vegan diet, you can easily adapt this recipe by omitting the eggs. Instead, try using plant-based proteins like tempeh or chickpeas. You can also enhance the dish with a drizzle of tahini or a sprinkle of nutritional yeast for a cheesy flavor.
These variations not only keep your meals exciting but also allow you to cater to different dietary preferences. I love how Bibimbap can be a canvas for creativity, making it a dish that everyone can enjoy!
Best Keto-Friendly Sides & Beverage Pairings
To elevate your Bibimbap experience, consider pairing it with some delicious keto-friendly sides and beverages. These options not only complement the flavors of the dish but also keep your meal balanced and satisfying. Here are my top recommendations:
- Cucumber salad with sesame dressing: This refreshing salad adds a crisp texture and a light, nutty flavor that pairs beautifully with the richness of Bibimbap.
- Kimchi: A classic Korean side, kimchi offers a spicy, fermented kick that enhances the overall flavor profile of your meal while providing gut-friendly probiotics.
- Sparkling water with lime: For a refreshing drink, opt for sparkling water with a squeeze of lime. It’s a light and zesty option that cleanses the palate between bites.
These sides and beverages not only complement your Bibimbap but also align perfectly with a keto lifestyle. Enjoy your meal!
FAQs About Making Bibimbap at Home
As you embark on your Bibimbap journey, you might have a few questions. Here are some common queries I’ve encountered, along with helpful answers to guide you:
What is the best rice to use for Bibimbap?
The best rice for Bibimbap is short-grain white rice, as it has a sticky texture that holds the ingredients together beautifully. This type of rice creates a satisfying base for the vibrant vegetables and egg, making each bite a delightful experience.
Can I make Bibimbap ahead of time?
Absolutely! Bibimbap can be made ahead of time, making it a fantastic option for meal prep. You can prepare the vegetables and rice in advance, then simply assemble and heat when you’re ready to eat. Just keep the gochujang and fried egg separate until serving for the best flavor and texture.
How do I store leftovers?
To store leftovers, place any uneaten Bibimbap in an airtight container in the refrigerator. It will stay fresh for up to three days. When reheating, I recommend adding a splash of water to the rice to prevent it from drying out. Enjoy your delicious leftovers!
Final Thoughts on This Easy Keto-Friendly Bibimbap
As I wrap up this delightful journey into the world of Bibimbap, I can’t help but reflect on the joy this dish brings to my kitchen. There’s something truly special about creating a vibrant bowl filled with fresh ingredients, each contributing its unique flavor and texture. The process of assembling Bibimbap is not just about cooking; it’s about sharing a piece of Korean culture and a heartfelt meal with loved ones.
I encourage you to try this easy keto-friendly Bibimbap recipe in your own home. Whether you’re cooking for yourself or gathering friends and family around the table, this dish is sure to impress. Don’t hesitate to experiment with different vegetables and proteins to make it your own. The beauty of Bibimbap lies in its versatility, allowing you to tailor it to your taste preferences.
Once you’ve made your own Bibimbap, I’d love to hear about your experience! Share your thoughts, variations, and any tips you discover along the way. Let’s foster a community of passionate home cooks who celebrate the joy of cooking and sharing delicious meals. Happy cooking, and enjoy every flavorful bite of your Bibimbap!
Print
Bibimbap: Discover the Ultimate Flavorful Bowl Today!
- Total Time: 35 minutes
- Yield: 4 servings 1x
- Diet: Vegetarian
Description
Bibimbap is a vibrant and flavorful Korean dish that combines rice with a variety of vegetables, a fried egg, and spicy gochujang.
Ingredients
- 2 cups cooked white rice
- 1 cup spinach, blanched and chopped
- 1 cup bean sprouts, blanched
- 1 cup carrots, julienned
- 1 cup zucchini, julienned
- 1 cup shiitake mushrooms, sliced
- 2 tablespoons vegetable oil
- 4 large eggs
- 4 tablespoons gochujang (Korean chili paste)
- 2 teaspoons sesame oil
- 1 tablespoon sesame seeds
- Salt, to taste
- Green onions, chopped (for garnish)
Instructions
- In a large skillet, heat 1 tablespoon of vegetable oil over medium heat. Add the zucchini and carrots, and sauté for about 3-4 minutes until tender. Season with a pinch of salt. Remove from skillet and set aside.
- In the same skillet, add another tablespoon of vegetable oil and sauté the shiitake mushrooms for about 3-4 minutes until they are soft. Season with salt and set aside.
- In a separate pot, bring water to a boil and blanch the spinach and bean sprouts for about 1-2 minutes. Drain and rinse under cold water. Squeeze out excess water and set aside.
- In a non-stick skillet, fry the eggs sunny-side up over medium heat until the whites are set but the yolks are still runny.
- To assemble, divide the cooked rice among four bowls. Arrange the sautéed zucchini, carrots, mushrooms, spinach, and bean sprouts on top of the rice in sections.
- Place a fried egg on top of each bowl. Drizzle with sesame oil and sprinkle with sesame seeds and chopped green onions.
- Serve with gochujang on the side, allowing each person to add to their taste.
Notes
- For a protein boost, add sliced grilled chicken, beef, or tofu to the mix.
- Experiment with different vegetables like bell peppers or radishes for added color and flavor.
- Prep Time: 15 minutes
- Cook Time: 20 minutes
- Category: Main Dish
- Method: Sautéing, Blanching, Frying
- Cuisine: Korean
Nutrition
- Serving Size: 1 bowl
- Calories: 550
- Sugar: 0g
- Sodium: 0mg
- Fat: 22g
- Saturated Fat: 0g
- Unsaturated Fat: 0g
- Trans Fat: 0g
- Carbohydrates: 65g
- Fiber: 0g
- Protein: 18g
- Cholesterol: 0mg


